Introduction: 10 Creative Ways to Display Christmas Cards
Every December, the mail pile transforms from bills and catalogs into something magical — envelopes filled with handwritten notes, glossy family photos, and glittery greetings from friends near and far. For me, one of the quiet joys of the season is spreading those cards out across the table, seeing familiar faces, and feeling instantly reconnected to the people who make the holidays meaningful.
I love finding creative ways to display them — not just to admire their beauty, but because those smiling faces and heartfelt messages become part of my home’s holiday story. Over the years, I’ve realized that the right card display can feel just as festive as the tree or garland — a little gallery of love and friendship that I often leave up well into January.
In this post, I’m sharing 10 creative and beautiful ways to display your Christmas cards, from simple DIY ideas to statement-worthy displays that complement any holiday style. You’ll also find tips for arranging your cards so they feel intentional (not cluttered), suggestions for mixing in seasonal decor, and a few favorite tools for keeping everything secure and stylish.
By the end, you’ll have plenty of ideas to turn those treasured cards into a charming part of your holiday home — displays that remind you, every time you walk by, of the people who make the season special.
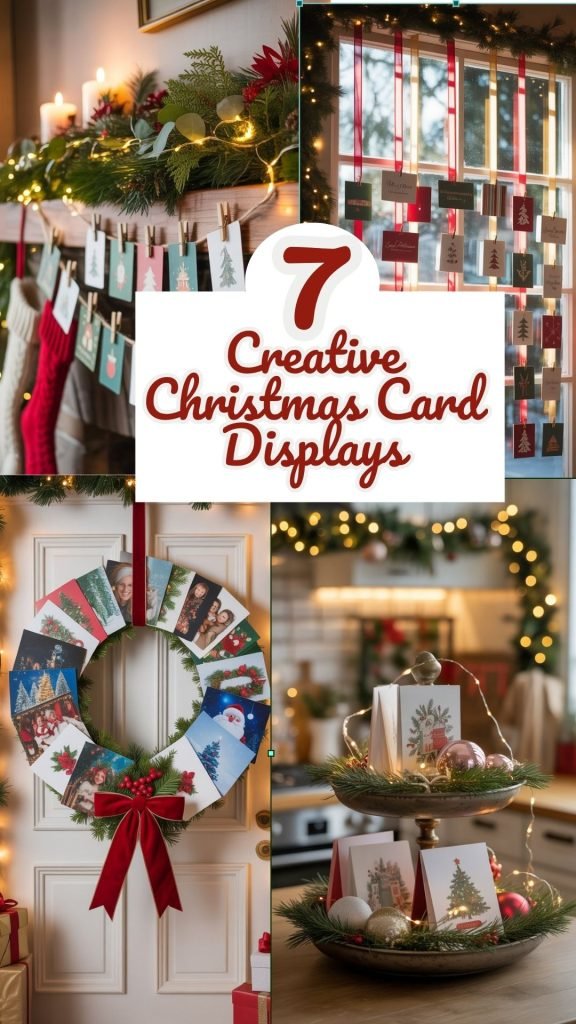
1. String Garland Display
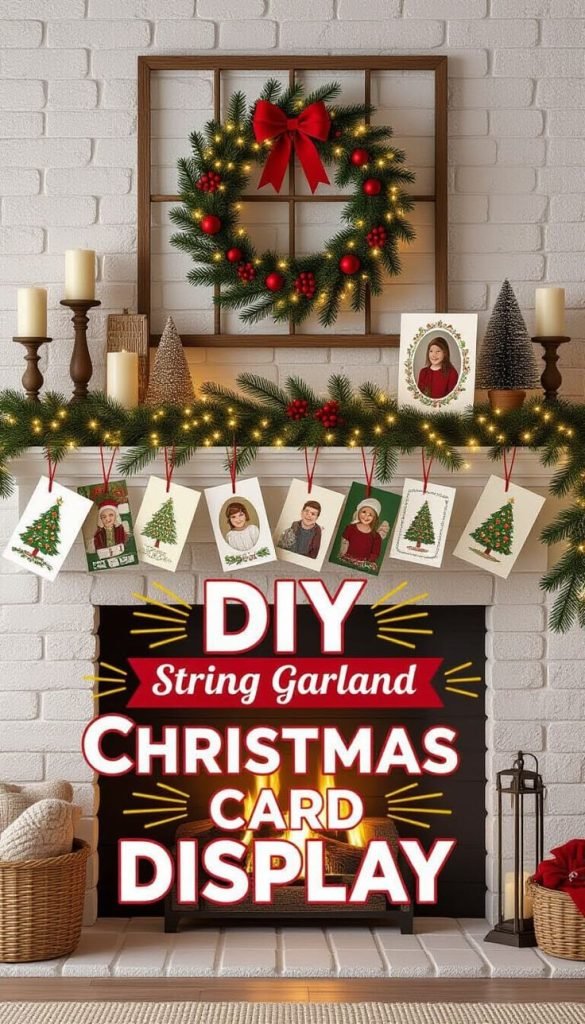
There’s something irresistibly nostalgic about a line of Christmas cards clipped to a length of twine or ribbon. It’s simple, sweet, and adaptable — the kind of display that instantly feels homey and full of personality. I love this idea because it keeps cards visible and easy to add to as more arrive throughout December.
How to Create It:
Stretch a strand of jute twine, satin ribbon, or even metallic cord across your mantel, stair banister, or an empty wall. Secure the ends with small nails, command hooks, or decorative tacks. As cards arrive, attach them using mini clothespins, gold binder clips, or tiny ornament hooks.
Styling Tips:
- Add a second layer: Hang two or three rows of twine at different heights for a fuller, more festive look.
- Light it up: Wrap a strand of warm white fairy lights around the twine to create a soft, magical glow in the evenings.
- Incorporate greenery: Layer in sprigs of pine, eucalyptus, or faux garland between cards for texture.
- Play with symmetry: For a polished look, balance the card arrangement — larger cards toward the center, smaller ones toward the edges.
- Curate the palette: Choose twine and clips that match your holiday color scheme (e.g., natural jute for rustic charm, red velvet ribbon for traditional warmth, or silver cord for modern sparkle).
Pro Tip: If you have kids’ artwork or holiday letters to display too, intersperse them among the cards. It turns the garland into a truly personal “family story line.”
Best For:
Rustic, cottage, or farmhouse-style homes — though the concept can easily shift modern with metallic ribbons or a minimalist color palette.
2. Card Tree Wall Art
This display idea is a total showstopper — and one of my personal favorites for smaller spaces. By arranging your Christmas cards in a triangular “tree” shape on the wall, you create a piece of seasonal art that’s both modern and meaningful. It’s simple to do, but the result feels polished, graphic, and full of spirit.
How to Create It:
Start by choosing a blank wall — an entryway, hallway, or above a console table works beautifully. Use removable adhesive dots, washi tape, or clear mounting squares to attach your cards in a tree formation: one card at the top, then two below, then three, and so on, until you’ve built a layered triangle.
Finish with a topper — a glittered star ornament, paper snowflake, or even a bow. Add a “trunk” made of ribbon, fabric, or a vertical row of smaller cards.
Styling Tips:
- Work from the middle outward: Lay out your design on the floor first to plan proportions before you start sticking things to the wall.
- Outline it with twinkle lights: Battery-powered fairy lights can trace the tree’s outline — creating a subtle glow that’s gorgeous at night.
- Play with card sizes: Mix small and large cards intentionally — larger pieces toward the bottom add visual weight, smaller ones near the top keep the shape balanced.
- Use cohesive colors: Choose cards that share a similar tone (like golds and creams, or reds and greens) for a curated effect.
- Add greenery: Drape small sprigs of faux pine or eucalyptus between cards to soften the shape and add dimension.
Pro Tip:
If you have kids or grandkids, let them decorate the “tree” with stickers, bows, or paper ornaments. It becomes an interactive project and a sweet holiday memory-maker.
Best For:
Apartments, condos, or anyone who loves big holiday style in a compact footprint. This one looks especially striking against a crisp white or colored accent wall.
3. Door Frame Greenery Garland Display
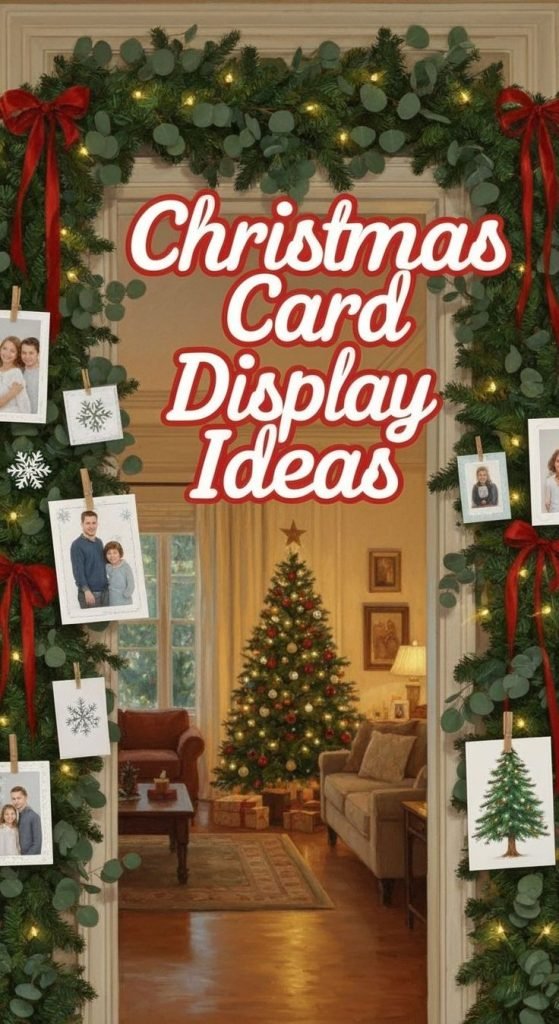
If your home feels like a revolving door of holiday gatherings, why not make that doorway a little more magical? Hanging Christmas cards along a greenery garland around a door frame is a timeless, elegant way to weave personal touches into your existing decor. It frames your space in warmth and cheer — and creates a beautiful focal point guests will notice as soon as they arrive.
How to Create It:
Start with a faux or fresh greenery garland long enough to drape around your doorway (most need about 9–12 feet). Secure the garland with removable hooks along the top and sides of the frame. Then, use mini clothespins, paper clips, or ornament hooks to attach cards directly to the garland.
You can display cards on just the top portion for a subtle effect, or go full-on festive and run them down the sides too.
Styling Tips:
- Choose your greenery: A lush pine or cedar garland feels traditional, while eucalyptus or mixed foliage offers a modern, organic look.
- Layer textures: Add ribbon, pinecones, berries, or ornaments between the cards to fill gaps and tie it to your overall decor theme.
- Balance the spacing: Alternate between photo cards and smaller folded ones so the display feels even. Avoid clustering too many in one section.
- Light it up: Weave a strand of battery-powered twinkle lights or fairy lights through the garland for soft illumination at night.
- Keep it secure: If you’re using fresh greenery, use floral wire to ensure both the garland and cards stay put as the branches dry.
Pro Tip:
This idea works beautifully around interior archways, too — imagine walking through a hallway framed with familiar faces and festive greetings! You can even switch the cards out for new arrivals throughout the season to keep it fresh.
Best For:
Traditional, classic, or transitional homes — anyone who wants a lush, welcoming display that feels grand but still personal.
4. Tiered Tray or Basket Display
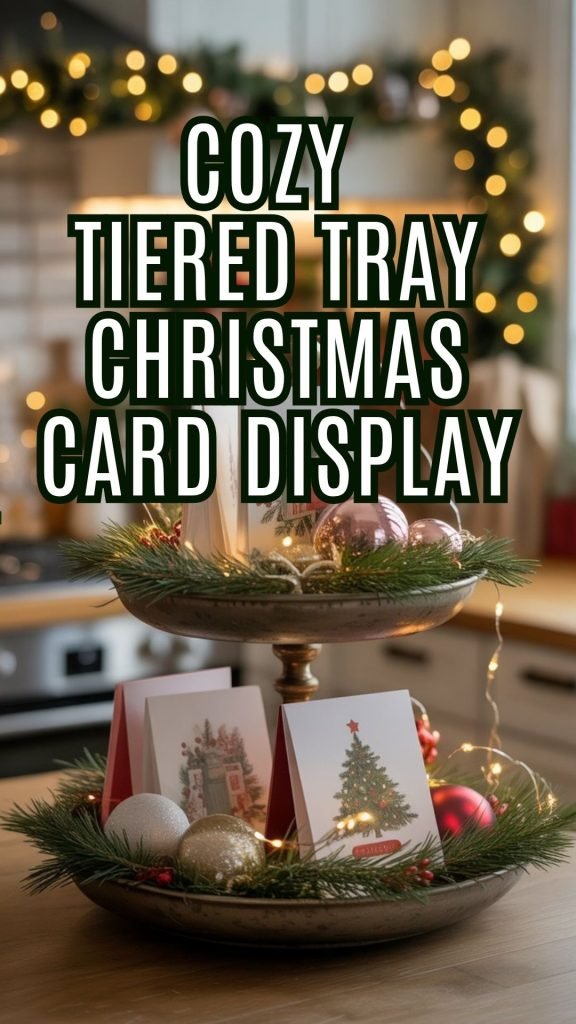
This idea brings all the cozy, lived-in charm of holiday decorating right to your countertop or coffee table. A tiered tray or decorative basket filled with Christmas cards creates a casual yet curated centerpiece that’s easy to update as new cards arrive. It’s warm, interactive, and ideal for spaces where family and guests naturally gather.
How to Create It:
Choose a two- or three-tiered serving tray, or a sturdy woven or metal basket with shallow sides. Line the base with greenery, faux snow, or a festive napkin to give the display a foundation. Then, tuck cards in vertically so their edges peek out — like a little garden of good wishes.
Mix in decorative accents such as small ornaments, pinecones, or cinnamon sticks to fill in spaces and add texture.
Styling Tips:
- Add height and balance: Position taller cards toward the back and lean smaller ones in front. Use coasters, spools, or mini boxes under cards to vary levels subtly.
- Blend scents and textures: A few dried orange slices or cinnamon bundles make it smell just as lovely as it looks.
- Incorporate light: Slip in a battery-operated candle or string of micro fairy lights for a gentle evening glow.
- Rotate weekly: Replace older cards with new arrivals or rearrange them for freshness — it’s a small change that keeps your decor feeling dynamic.
- Match your theme: Rustic baskets pair beautifully with natural greenery; metallic trays complement modern or glam spaces.
Pro Tip:
If you receive lots of photo cards, tuck them in clear acrylic sleeves before displaying — they’ll stay upright and protected from spills if your tray sits near food or drinks.
Best For:
Kitchens, breakfast nooks, or coffee tables — anywhere you want to bring your “holiday mail” into the heart of your home for daily enjoyment.
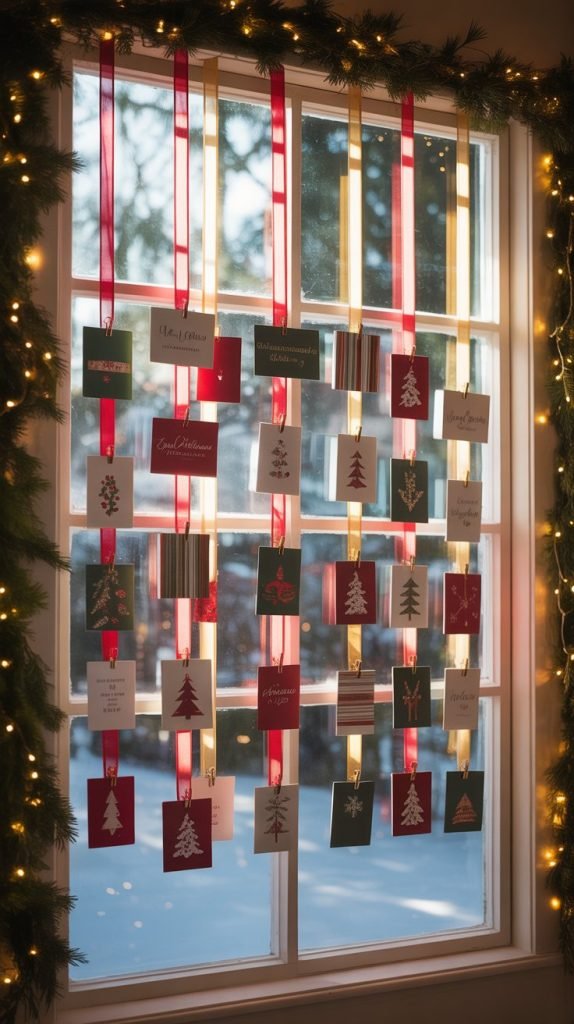
5. Window Ribbon Display
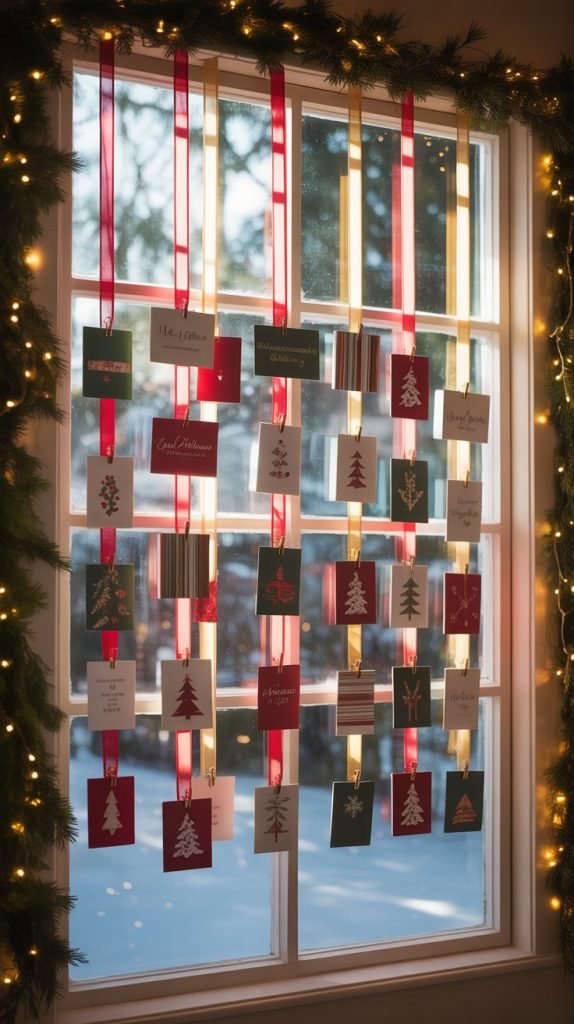
There’s something magical about sunlight streaming through a window and catching the shimmer of Christmas cards. Hanging your cards vertically from festive ribbons creates a cheerful, space-saving display that looks stunning both inside and from the street. It’s a simple, elegant solution that instantly feels polished and joyful.
How to Create It:
Choose a sunny window or glass door where your cards will get plenty of natural light. Cut lengths of wide ribbon — velvet, satin, or grosgrain all work beautifully — and attach them vertically to the top of the window frame using removable hooks or small tacks. Then, use mini clothespins, double-sided tape, or decorative clips to secure cards along each ribbon.
Let the ribbons hang freely or anchor them at the bottom with a small weight (like an ornament or jingle bell) to keep them from swaying too much.
Styling Tips:
- Pick your palette: Choose ribbons that coordinate with your room’s holiday theme — think deep burgundy and gold for traditional style, or icy blue and silver for a winter wonderland feel.
- Layer for dimension: Try three to five ribbons spaced evenly across the window for a balanced look. Cards can overlap slightly for fullness.
- Add sparkle: Intertwine a strand of battery-operated fairy lights with the ribbons, or add small metallic bows between cards.
- Use symmetry: If displaying in a pair of windows, mirror the ribbon placement in each to keep the look intentional.
- Mind the sun: If direct sunlight hits your cards for hours each day, rotate them occasionally to prevent fading.
Pro Tip:
Hang your first ribbon slightly off-center to create a more organic, relaxed feel — especially lovely in casual spaces like breakfast nooks or sunrooms.
Best For:
Bright, airy rooms where natural light enhances the shimmer of holiday cards. This display looks equally beautiful during the day and glowing softly at night.
6. Repurposed Frame Display
If you love a good DIY project (and who among us doesn’t around the holidays?), this idea turns an unused frame into a charming, customizable Christmas card display. It’s a blend of rustic creativity and timeless style — plus, it’s easy to adapt for any decor theme, from farmhouse to modern glam.
How to Create It:
Start with an old picture frame, windowpane, or even a large empty photo mat. Remove the glass, leaving just the frame. Stretch twine, string, or thin ribbon across the back in horizontal rows, securing each end with a staple gun, hot glue, or small tacks. Then, clip your cards to the rows using mini clothespins or decorative clips.
You can hang the frame on the wall, lean it on a mantel, or even place it on a console table as a layered backdrop.
Styling Tips:
- Choose your vibe:
- Paint the frame matte white or distressed gray for a farmhouse feel.
- Try gold or metallic spray paint for a glam holiday look.
- Go bold with red or green for a pop of Christmas color.
- Add texture: Wrap a bit of greenery or fairy lights around the edges of the frame for warmth and sparkle.
- Mix materials: Twine gives a rustic feel; satin ribbon feels elegant; jute string adds a natural touch.
- Play with layout: Arrange your rows closer together if you receive lots of cards, or space them out to showcase fewer, larger ones.
- Personalize: Add a “Merry Mail” or “Season’s Greetings” label across the top with stenciled letters or vinyl cutouts.
Pro Tip:
If your frame is lightweight, you can easily hang it with command strips — just make sure to press them firmly to support the tension of the twine and cards.
Best For:
Vintage-inspired, eclectic, or farmhouse homes — and anyone who enjoys upcycling something old into something beautiful. This project doubles as a creative craft moment and a sentimental focal point once complete.
7. Magnetic Board or Chalkboard Gallery
For those who love a little creativity and flexibility, a magnetic or chalkboard gallery is the ultimate mix of functional and fun. It’s ideal for families, offices, or kitchens — anywhere you want to enjoy your cards up close and refresh the display as new ones arrive. Plus, it gives you a creative canvas for personal touches, doodles, or festive messages.
How to Create It:
Start with a magnetic board, chalkboard, or dry-erase surface (you can even paint a section of wall with magnetic or chalkboard paint). Mount the board in a central location — maybe near your kitchen table, in a mudroom, or next to your coffee station.
Use magnetic clips, washi tape, or push pins (if cork-backed) to attach cards in an organic arrangement. Leave space between clusters for writing holiday notes or decorative chalk sketches.
Styling Tips:
- Add festive borders: Frame the board with a garland, string lights, or ribbon to make it feel intentional.
- Layer artfully: Combine photo cards, postcards, and even small gift tags or Polaroids for a playful collage effect.
- Get interactive: Encourage family members to write little notes or countdown numbers (“10 days to Christmas!”).
- Group by theme: Arrange cards by family, friends, or locations — it’s a subtle storytelling touch that guests love to explore.
- Use magnetic containers: Tiny metal tins can hold chalk, markers, or extra clips neatly on the board itself.
Pro Tip:
Write a short “Merry Mail” or “Holiday Cheer” heading across the top in pretty script (use chalk markers or white paint pens). It adds a professional finish while keeping the vibe casual and fun.
Best For:
Kitchens, playrooms, or home offices — especially if you enjoy decor that’s both practical and interactive. It’s easy to tweak daily, making it one of the most adaptable 7. Magnetic Board or Chalkboard Gallery
For those who love a little creativity and flexibility, a magnetic or chalkboard gallery is the ultimate mix of functional and fun. It’s ideal for families, offices, or kitchens — anywhere you want to enjoy your cards up close and refresh the display as new ones arrive. Plus, it gives you a creative canvas for personal touches, doodles, or festive messages.
How to Create It:
Start with a magnetic board, chalkboard, or dry-erase surface (you can even paint a section of wall with magnetic or chalkboard paint). Mount the board in a central location — maybe near your kitchen table, in a mudroom, or next to your coffee station.
Use magnetic clips, washi tape, or push pins (if cork-backed) to attach cards in an organic arrangement. Leave space between clusters for writing holiday notes or decorative chalk sketches.
Styling Tips:
- Add festive borders: Frame the board with a garland, string lights, or ribbon to make it feel intentional.
- Layer artfully: Combine photo cards, postcards, and even small gift tags or Polaroids for a playful collage effect.
- Get interactive: Encourage family members to write little notes or countdown numbers (“10 days to Christmas!”).
- Group by theme: Arrange cards by family, friends, or locations — it’s a subtle storytelling touch that guests love to explore.
- Use magnetic containers: Tiny metal tins can hold chalk, markers, or extra clips neatly on the board itself.
Pro Tip:
Write a short “Merry Mail” or “Holiday Cheer” heading across the top in pretty script (use chalk markers or white paint pens). It adds a professional finish while keeping the vibe casual and fun.
Best For:
Kitchens, playrooms, or home offices — especially if you enjoy decor that’s both practical and interactive. It’s easy to tweak daily, making it one of the most adaptable display ideas in the list.7. Magnetic Board or Chalkboard Gallery
For those who love a little creativity and flexibility, a magnetic or chalkboard gallery is the ultimate mix of functional and fun. It’s ideal for families, offices, or kitchens — anywhere you want to enjoy your cards up close and refresh the display as new ones arrive. Plus, it gives you a creative canvas for personal touches, doodles, or festive messages.
How to Create It:
Start with a magnetic board, chalkboard, or dry-erase surface (you can even paint a section of wall with magnetic or chalkboard paint). Mount the board in a central location — maybe near your kitchen table, in a mudroom, or next to your coffee station.
Use magnetic clips, washi tape, or push pins (if cork-backed) to attach cards in an organic arrangement. Leave space between clusters for writing holiday notes or decorative chalk sketches.
Styling Tips:
- Add festive borders: Frame the board with a garland, string lights, or ribbon to make it feel intentional.
- Layer artfully: Combine photo cards, postcards, and even small gift tags or Polaroids for a playful collage effect.
- Get interactive: Encourage family members to write little notes or countdown numbers (“10 days to Christmas!”).
- Group by theme: Arrange cards by family, friends, or locations — it’s a subtle storytelling touch that guests love to explore.
- Use magnetic containers: Tiny metal tins can hold chalk, markers, or extra clips neatly on the board itself.
Pro Tip:
Write a short “Merry Mail” or “Holiday Cheer” heading across the top in pretty script (use chalk markers or white paint pens). It adds a professional finish while keeping the vibe casual and fun.
Best For:
Kitchens, playrooms, or home offices — especially if you enjoy decor that’s both practical and interactive. It’s easy to tweak daily, making it one of the most adaptable display ideas in the list.7. Magnetic Board or Chalkboard Gallery
For those who love a little creativity and flexibility, a magnetic or chalkboard gallery is the ultimate mix of functional and fun. It’s ideal for families, offices, or kitchens — anywhere you want to enjoy your cards up close and refresh the display as new ones arrive. Plus, it gives you a creative canvas for personal touches, doodles, or festive messages.
How to Create It:
Start with a magnetic board, chalkboard, or dry-erase surface (you can even paint a section of wall with magnetic or chalkboard paint). Mount the board in a central location — maybe near your kitchen table, in a mudroom, or next to your coffee station.
Use magnetic clips, washi tape, or push pins (if cork-backed) to attach cards in an organic arrangement. Leave space between clusters for writing holiday notes or decorative chalk sketches.
Styling Tips:
- Add festive borders: Frame the board with a garland, string lights, or ribbon to make it feel intentional.
- Layer artfully: Combine photo cards, postcards, and even small gift tags or Polaroids for a playful collage effect.
- Get interactive: Encourage family members to write little notes or countdown numbers (“10 days to Christmas!”).
- Group by theme: Arrange cards by family, friends, or locations — it’s a subtle storytelling touch that guests love to explore.
- Use magnetic containers: Tiny metal tins can hold chalk, markers, or extra clips neatly on the board itself.
Pro Tip:
Write a short “Merry Mail” or “Holiday Cheer” heading across the top in pretty script (use chalk markers or white paint pens). It adds a professional finish while keeping the vibe casual and fun.
Best For:
Kitchens, playrooms, or home offices — especially if you enjoy decor that’s both practical and interactive. It’s easy to tweak daily, making it one of the most adaptable display ideas in the list.7. Magnetic Board or Chalkboard Gallery
For those who love a little creativity and flexibility, a magnetic or chalkboard gallery is the ultimate mix of functional and fun. It’s ideal for families, offices, or kitchens — anywhere you want to enjoy your cards up close and refresh the display as new ones arrive. Plus, it gives you a creative canvas for personal touches, doodles, or festive messages.
How to Create It:
Start with a magnetic board, chalkboard, or dry-erase surface (you can even paint a section of wall with magnetic or chalkboard paint). Mount the board in a central location — maybe near your kitchen table, in a mudroom, or next to your coffee station.
Use magnetic clips, washi tape, or push pins (if cork-backed) to attach cards in an organic arrangement. Leave space between clusters for writing holiday notes or decorative chalk sketches.
Styling Tips:
- Add festive borders: Frame the board with a garland, string lights, or ribbon to make it feel intentional.
- Layer artfully: Combine photo cards, postcards, and even small gift tags or Polaroids for a playful collage effect.
- Get interactive: Encourage family members to write little notes or countdown numbers (“10 days to Christmas!”).
- Group by theme: Arrange cards by family, friends, or locations — it’s a subtle storytelling touch that guests love to explore.
- Use magnetic containers: Tiny metal tins can hold chalk, markers, or extra clips neatly on the board itself.
Pro Tip:
Write a short “Merry Mail” or “Holiday Cheer” heading across the top in pretty script (use chalk markers or white paint pens). It adds a professional finish while keeping the vibe casual and fun.
Best For:
Kitchens, playrooms, or home offices — especially if you enjoy decor that’s both practical and interactive. It’s easy to tweak daily, making it one of the most adaptable display ideas in the list.7. Magnetic Board or Chalkboard Gallery
For those who love a little creativity and flexibility, a magnetic or chalkboard gallery is the ultimate mix of functional and fun. It’s ideal for families, offices, or kitchens — anywhere you want to enjoy your cards up close and refresh the display as new ones arrive. Plus, it gives you a creative canvas for personal touches, doodles, or festive messages.
How to Create It:
Start with a magnetic board, chalkboard, or dry-erase surface (you can even paint a section of wall with magnetic or chalkboard paint). Mount the board in a central location — maybe near your kitchen table, in a mudroom, or next to your coffee station.
Use magnetic clips, washi tape, or push pins (if cork-backed) to attach cards in an organic arrangement. Leave space between clusters for writing holiday notes or decorative chalk sketches.
Styling Tips:
- Add festive borders: Frame the board with a garland, string lights, or ribbon to make it feel intentional.
- Layer artfully: Combine photo cards, postcards, and even small gift tags or Polaroids for a playful collage effect.
- Get interactive: Encourage family members to write little notes or countdown numbers (“10 days to Christmas!”).
- Group by theme: Arrange cards by family, friends, or locations — it’s a subtle storytelling touch that guests love to explore.
- Use magnetic containers: Tiny metal tins can hold chalk, markers, or extra clips neatly on the board itself.
Pro Tip:
Write a short “Merry Mail” or “Holiday Cheer” heading across the top in pretty script (use chalk markers or white paint pens). It adds a professional finish while keeping the vibe casual and fun.
Best For:
Kitchens, playrooms, or home offices — especially if you enjoy decor that’s both practical and interactive. It’s easy to tweak daily, making it one of the most adaptable display ideas in the list.display i
deas in the list.
8. Ladder Display
If you’re drawn to displays that feel warm, creative, and just a little bit unexpected, the ladder display might become your favorite. A simple decorative ladder — the kind you might use for blankets or plants — transforms into a vertical gallery of cheerful Christmas cards. It’s eye-catching, easy to assemble, and perfect for cozy corners that need a touch of holiday spirit.
How to Create It:
Start with a wooden or metal ladder (a blanket ladder works beautifully). Lean it securely against the wall or hang it flat for a more streamlined look. Wrap a length of twine, jute cord, or ribbon horizontally across each rung, securing with knots or tiny nails at the sides. Then, clip your cards to each row with mini clothespins or metallic clips.
If you prefer a minimalist look, simply tuck the cards directly behind each rung without using string — it’s subtle and sleek.
Styling Tips:
- Add layers: Weave a strand of fairy lights or greenery (like eucalyptus or pine garland) along the ladder’s edges. It softens the lines and adds that cozy twinkle.
- Mix heights: Let some cards hang lower on ribbons, while others stay close to the rungs for a natural, collected feel.
- Personalize it: Tie small ornaments, bells, or bows between cards for an extra festive touch.
- Create a base vignette: Place wrapped gifts, lanterns, or a small basket of pinecones at the foot of the ladder for visual balance.
- Keep it safe: If you have pets or little ones, anchor the ladder with clear wall mounts or hooks so it can’t tip.
Pro Tip:
If your ladder has wide rungs, you can even mix in other seasonal items — mini wreaths, postcards, or polaroids from past holidays. It becomes a sentimental timeline that grows each year.
Best For:
Rustic, farmhouse, or eclectic homes — and anyone who loves a vertical focal point that feels both artistic and heartwarming.
9. Clipboards or Pegboard Wall
This is such a fun, flexible option — part functional display, part art installation. Clipboards or pegboards give you an easy way to swap cards in and out, add new arrivals, and rearrange as your holiday mail comes in. It’s great for those who love clean lines and a touch of creative organization — and it’s a surprisingly chic look when styled thoughtfully.
How to Create It:
Mount several clipboards in a grid or linear formation on the wall — four to six usually works well, depending on your space. Paint or wrap the clipboards in coordinating paper or fabric (like kraft paper, plaid, or metallic cardstock) before attaching your cards for a decorative backdrop.
If you prefer a pegboard, paint it in your chosen holiday color (white, deep green, or gold look especially festive), and use pegs, hooks, or ribbon loops to hang cards in an organic pattern.
Styling Tips:
- Add dimension: Mix in a few other holiday elements like postcards, family photos, or even recipe cards — it becomes a little gallery of your season.
- Play with uniformity: Matching clipboards in one color create a minimalist look, while mismatched vintage ones feel more eclectic and homey.
- Use layering: Try overlapping cards slightly or clipping smaller notes and tags on top of larger photo cards for depth.
- Add headline flair: Above your clipboard grid, stencil or vinyl-cut a short phrase like “Season’s Greetings” or “Merry Mail.”
- For pegboards: Wrap a few cards in ribbons and hang mini ornaments or bells from the pegs between cards.
Pro Tip:
This is an excellent idea if you like to refresh your decor frequently — the clips make it effortless to swap old cards for new or transition the display for other holidays (Valentine’s Day cards, spring postcards, etc.).
Best For:
Modern, minimalist, or Scandinavian-inspired spaces — or anyone who appreciates order with a creative twist. It’s both organized and artful, blending festive cheer with clean design.
10. Wreath Display
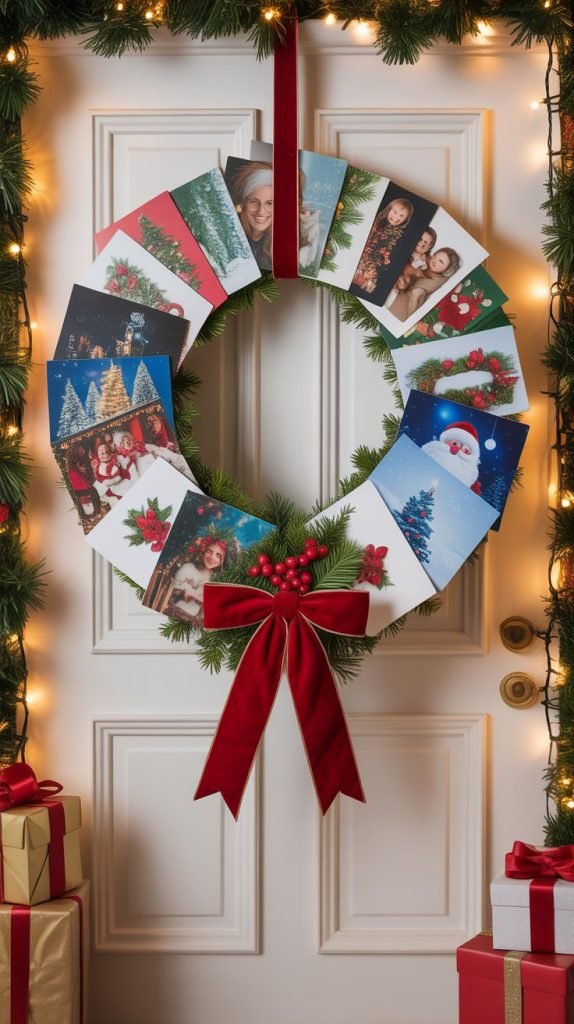
This one feels like pure Christmas magic. A wreath made from your holiday cards transforms sentimental notes and photos into a showstopping, one-of-a-kind decoration. Whether you hang it on the front door or over your mantel, it radiates personality, color, and heartfelt connection — a literal circle of cheer.
How to Create It:
Start with a wire or foam wreath form (available at most craft stores). Arrange your cards in a circular pattern, overlapping them slightly so they fan outward. Secure them with floral wire, small binder clips, or double-sided tape, depending on your wreath base.
You can cover the entire form with cards, or just use them as accents mixed with greenery, ribbons, and ornaments for a layered look.
Styling Tips:
- Plan your layout: Lay cards out on a table first before attaching — mix horizontal and vertical cards for balance, and alternate sizes to avoid symmetry overload.
- Add greenery: Tuck faux pine branches, berries, or eucalyptus between cards to fill gaps and add texture.
- Create a focal point: Use a favorite photo card or extra-large greeting in the center or at the bottom as your “anchor.”
- Finish with ribbon: A wide velvet or burlap bow adds the perfect finishing touch. You can also suspend the wreath with a loop of coordinating ribbon.
- Keep it fresh: If using tape, periodically check the cards’ edges — humidity or heat can loosen adhesives over time.
Pro Tip:
For a twist, mount your wreath form onto a large picture frame or mirror for extra presence. Or make mini versions (using embroidery hoops!) for each family member’s room — it’s a sweet way to personalize the decor.
Best For:
Traditional, classic, or eclectic homes — and anyone who wants a display that doubles as both art and memory-keeper.
Troubleshooting & Common Mistakes: Making Your Christmas Card Displays Last All Season
Even the prettiest Christmas card display can run into a few hiccups — curling corners, cards sliding down, or that one strip of tape that refuses to stick when the humidity changes. Here are the most common issues (and easy fixes) so your display stays beautiful through New Year’s — and maybe even beyond.
1. Cards Falling Off or Curling
The problem: Lightweight cards or glossy photo cards sometimes slip out of clips or curl at the edges, especially near fireplaces or windows.
The fix:
- Use mini clothespins with a light grip or small binder clips instead of tape for easy reattachment.
- If curling is an issue, press cards under a heavy book overnight before hanging.
- For extra security, add a tiny piece of removable mounting putty to the back corners.
2. Adhesives Damaging Walls or Paint
The problem: Tape and sticky dots can pull paint off when removed, especially after several weeks.
The fix:
- Always opt for removable Command hooks or poster strips.
- When in doubt, test one small spot first.
- Avoid masking or painter’s tape on walls — it can dry out and flake paint.
3. Displays Feeling Cluttered or Uneven
The problem: When too many cards crowd together, the overall look feels busy instead of festive.
The fix:
- Edit! Rotate cards weekly — keep out the newest or most sentimental ones, and store extras in a pretty box or album.
- Create visual rhythm: alternate portrait and landscape cards, or group by size.
- Stick to a color palette or display theme (natural greenery, metallics, or red-and-white classic).
4. Sunlight Fading Cards
The problem: Direct sunlight can fade ink or photo prints — especially on window displays.
The fix:
- Rotate cards every few days to give each side equal exposure.
- Use UV-resistant window film if you regularly hang decor in sunny spots.
- Or, display photocopies of sentimental cards in bright windows and keep the originals tucked safely away.
5. Garlands or Frames Sagging Over Time
The problem: Heavier cards can cause garlands or twine to droop.
The fix:
- Add extra support hooks along long stretches (every 2–3 feet).
- Use stronger materials like jute rope, wire-edged ribbon, or fishing line.
- When possible, hang garlands at slight upward angles — it helps disguise gentle sagging as natural drape.
6. Cards Blending into the Background
The problem: Cards can disappear visually against busy wallpaper or similar colors.
The fix:
- Add a simple backdrop — a solid runner of kraft paper, burlap, or fabric behind your cards will make them pop.
- Metallic clips or bows help highlight individual pieces.
- Or, mount a few standout cards in frames or mats to break up the pattern.
7. Fresh Greenery Drying Out
The problem: Real garlands can shed needles or lose vibrancy.
The fix:
- Mist greenery lightly every few days.
- Choose spots away from heat vents or direct sunlight.
- Consider preserved or high-quality faux greenery for longevity — it can be reused year after year.
8. Uneven Weight Distribution on Doors or Frames
The problem: Hanging cards unevenly can pull garlands or ribbons off-center.
The fix:
- Start at the center and work outward.
- Balance large photo cards across the top or bottom.
- Secure heavy sections with discreet floral wire or extra hooks.
9. Difficulty Removing Adhesive Residue
The problem: Leftover stickiness on trim or glass.
The fix:
- Use a soft cloth and rubbing alcohol or vinegar to dissolve residue gently.
- Avoid harsh scrapers that can damage paint or finishes.
10. Not Enough Cards Yet?
The problem: Early in the season, your display may look sparse.
The fix:
- Mix in vintage postcards, holiday tags, or small ornaments until more cards arrive.
- Leave space intentionally — it gives your display room to “grow” throughout December.
Frequently Asked Questions: Christmas Card Displays
1. When should I start displaying Christmas cards?
Most people begin setting up displays in early December — around the same time they decorate the tree. But honestly, there’s no wrong time! If cards start arriving early, go ahead and hang a few. You can always expand or refresh the display as more come in.
2. How can I keep cards from getting damaged?
Avoid using tape directly on cards — it can pull off the paper finish when removed. Instead, use clips, ribbons, or mini clothespins. If you’re displaying them near the kitchen or fireplace, consider placing photo cards in clear acrylic sleeves to protect them from humidity or heat.
3. Can I mix photo cards with traditional folded ones?
Absolutely! The mix actually adds more visual interest. Try alternating photo cards and folded ones along a garland, or place photo cards toward the center of your display so faces stand out.
4. How can I make my display look cohesive if the cards don’t match?
Use consistency in your display materials rather than the cards themselves. Matching clips, coordinated ribbon colors, or a single greenery type (like cedar or eucalyptus) can make even the most eclectic mix look beautifully intentional.
5. What’s the best way to store cards after the holidays?
Keep them in a decorative memory box or photo album. I like to add a small note or label inside the lid with the year. For photo cards, a small ring binder or recipe box with dividers works perfectly.
6. How long should I leave my Christmas card display up?
There’s no rule here — I often leave mine up well into January! Since they’re so personal and cheerful, they blend beautifully into winter decor even after the tree comes down.
7. Can I reuse my card display next year?
Definitely. Many of these ideas — like garlands, frames, ladders, or trays — can be reused with just small updates. Swap in new ribbon colors or accent pieces to give the same base a fresh twist each season.
8. What should I do with leftover cards I can’t display?
Store the extras in a keepsake box or turn them into DIY projects: cut them into gift tags, ornaments, or holiday collages. It’s a great way to repurpose the pretty artwork and preserve meaningful messages.
Next Steps & Pro Tips: Taking Your Christmas Card Displays to the Next Level
Once you’ve found your favorite way to showcase your holiday cards, there are plenty of ways to elevate the look even further — and make it a cherished annual tradition. These small enhancements can turn a simple display into a design moment that feels custom, curated, and deeply personal.
1. Layer Lighting Thoughtfully
Soft lighting adds instant magic. Try weaving fairy lights, mini lanterns, or battery-operated candles near your display. Warm white tones highlight colors beautifully without overpowering them. For a more contemporary touch, use LED micro-lights with a subtle shimmer effect.
2. Add Natural Elements for Texture
Pair your cards with organic materials: pinecones, cinnamon sticks, dried citrus slices, or sprigs of greenery. These tactile layers create depth and bring that “fresh holiday” feel indoors — even if your garland is faux.
3. Mix Sentimental with Stylish
Don’t be afraid to include mementos alongside your cards — maybe a child’s drawing, a vintage ornament, or an old black-and-white holiday snapshot. These details personalize the display and make it feel like part of your home’s story, not just decoration.
4. Create a Yearly Memory Tradition
Each January, take a quick photo of your finished display before you take it down. Store that photo with your cards or in a digital holiday album. Over the years, it becomes a beautiful record of changing friends, family, and festive styles.
5. Match Your Display to Your Decor Style
Your Christmas card setup can harmonize with your home’s overall aesthetic:
- Modern home: Stick to neutral ribbons, clean lines, and metallic accents.
- Rustic home: Incorporate twine, burlap, and natural greenery.
- Glam style: Go for satin ribbons, glass ornaments, and gold accents.
- Minimalist: Use fewer cards but display them with purpose — think black-and-white prints or uniform photo sizes.
6. Blend Displays Across Rooms
Instead of keeping all your cards in one spot, sprinkle smaller displays around the house — a garland over the kitchen window, a small ladder by the entryway, or a tabletop tray in the living room. It keeps the spirit flowing throughout your home.
7. Use Displays Year-Round (with a Twist)
Many of these setups can live beyond the holidays. After Christmas, swap cards for postcards, family photos, or seasonal prints. The same ladder, garland, or clipboard wall can transition beautifully into spring or summer decor.
8. Incorporate Scents for a Multi-Sensory Moment
Tuck a few cinnamon sticks, dried orange slices, or wax sachets near your display. Scents tie emotion to memory — and a gentle whiff of clove or pine makes your display all the more memorable.
Conclusion: Turning Holiday Greetings into Heartfelt Decor
At its core, displaying Christmas cards is about more than just filling space — it’s about surrounding yourself with the faces and words that make the season meaningful. Each card carries a little piece of someone’s love and joy, and turning them into part of your holiday decor lets those connections shine every day.
Whether you go for a lush garland around a doorway, a cozy basket of cards on your kitchen counter, or a glowing wall display, what matters most is that it feels like you. I always find that by the time I’ve arranged my cards — layering in lights, greenery, and familiar faces — my home feels instantly warmer, even before the tree is trimmed.
And don’t rush to take them down, either. Leaving your card display up a few extra weeks after Christmas extends that cozy, grateful feeling into the new year — a gentle reminder of all the friendships, laughter, and love that carry you forward.
So gather your cards, grab some ribbon and twine, and make a little space in your home for holiday joy that’s both creative and personal. These displays aren’t just decorations — they’re visual stories of connection, and that’s what makes them truly beautiful.