
I really love handmade holiday decor for my Christmas home aesthetic. A new favorite: creating beautiful pieces with simple materials like air dry clay. This versatile medium lets you design ornaments, garlands, tags, and table accents that look artisan-made yet are easy enough for beginners. Whether you love minimalist Scandinavian style or whimsical cottage charm, air dry clay can be molded, stamped, and painted to suit any holiday theme.
In this post, you’ll discover a collection of creative ways to use air dry clay for your Christmas ornaments and decorations. Each idea includes helpful tips, design inspiration, and simple steps to make your projects turn out beautifully.
1. Pressed Botanical Ornaments
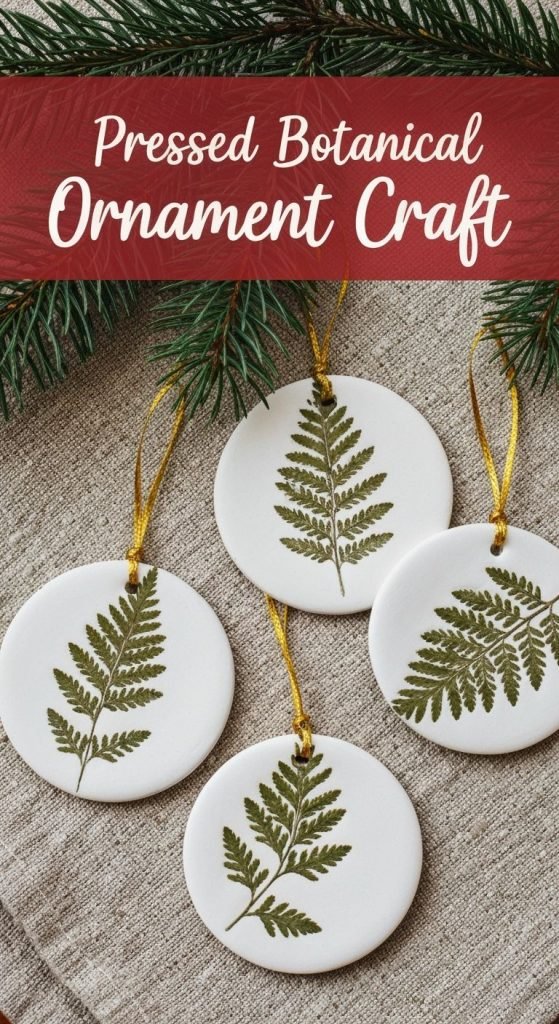
Bring a touch of nature to your Christmas tree with delicate imprints of evergreen sprigs, ferns, or herbs pressed into air dry clay. These ornaments have an elegant, organic look that fits beautifully with rustic, Scandinavian, or cottage-style holiday décor. Each one is unique—like a small work of art made from your own backyard finds.
Supplies:
- White or natural air dry clay (or tint with a few drops of acrylic paint for soft hues)
- Rolling pin or glass bottle
- Leaf or botanical sprigs (try cedar, fern, pine, rosemary, or eucalyptus)
- Cookie cutters in your preferred shapes (round, star, tree, heart, etc.)
- Straw or skewer for creating hanging holes
- Twine, jute, or silk ribbon
- Optional: metallic paint, fine brush, matte sealer spray
How to Make:
- Prepare your materials. Gather a variety of sprigs and leaves with interesting textures—needle-like evergreens, fern fronds, or even pressed flowers work well.
- Roll out the clay. Flatten your clay on a non-stick surface (wax paper or a silicone mat) to about ¼-inch thick. Rotate occasionally to prevent sticking.
- Press the botanicals. Place a sprig onto the clay and gently roll over it to leave a clear impression. Lift it off carefully to reveal the natural pattern.
- Cut your shapes. Use cookie cutters to create ornaments—simple circles show the details beautifully, while stars or hearts add variety.
- Make the hanging hole. Use a straw or skewer to poke a clean hole at the top for threading ribbon later.
- Dry completely. Let air dry on a flat surface for 24–48 hours, flipping halfway through for even drying.
- Decorate. Once dry, brush the raised texture lightly with gold, copper, or white paint for a frosted look. Finish with a matte sealer if desired.
- Add ribbon. Thread with twine or a soft velvet ribbon for a natural yet polished finish.
Style & Display Tips:
- Mix shapes and sizes for a collected look on your Christmas tree.
- Layer these ornaments among pinecones and wooden beads for an earthy, textural tree theme.
- Use smaller versions as gift toppers, napkin accents, or stocking charms.
- For a cohesive look, coordinate your paint accents with your metallic décor (e.g., gold, champagne, or brushed bronze).
2. Personalized Name Ornaments
Nothing feels more thoughtful than custom-made name ornaments for family, friends, or even pets. These clay tags are perfect as both keepsakes and functional gift toppers—simple to make but endlessly personal.
Supplies:
- Air dry clay (white or lightly tinted)
- Rolling pin
- Alphabet stamps or letter embossers
- Cookie cutters (round, oval, or tag-shaped)
- Straw or skewer for hole punching
- Twine, jute, or ribbon for hanging
- Optional: metallic paint pen or fine brush for edging
How to Make:
- Roll out clay to ¼-inch thickness.
- Cut into desired shape using a cookie cutter or knife.
- Press letter stamps firmly into the clay to spell each name.
- Make a small hole at the top for hanging.
- Let dry completely for 24–48 hours.
- Paint the edges or letters for added color and seal with a matte finish.
Style Tip:
Tie each ornament onto a wrapped gift with matching ribbon, or hang them on stockings for a personalized touch that doubles as a holiday keepsake.
3. Textured Pattern Ornaments
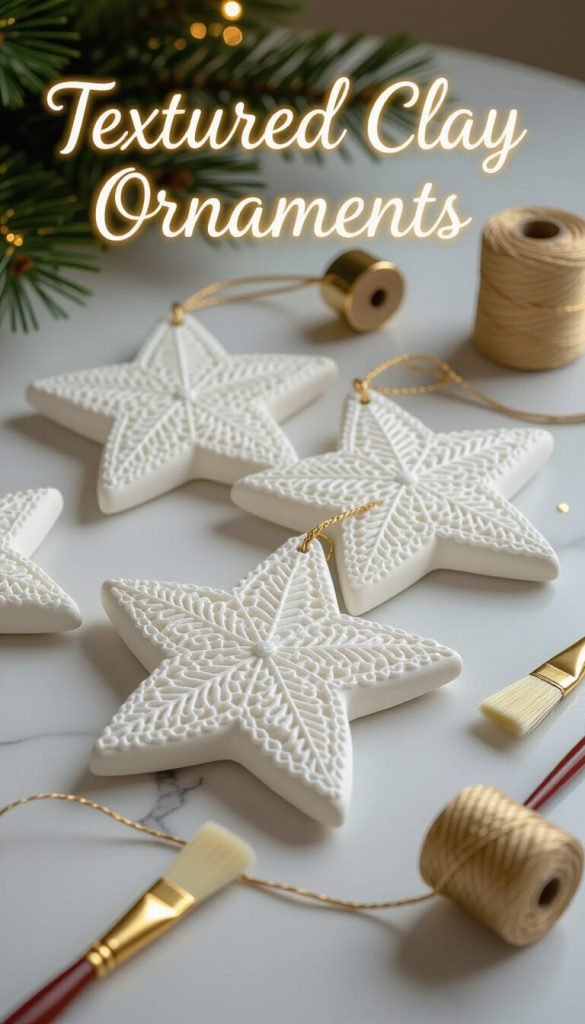
For a modern-meets-handcrafted vibe, try creating ornaments with subtle textures—think lace, knit fabric, or embossed patterns pressed into the clay. These pieces add depth and interest to minimalist trees or neutral décor themes.
Supplies:
- Air dry clay (white, marble, or tinted)
- Rolling pin
- Lace fabric, burlap, knit texture, or embossed rolling pin
- Cookie cutters
- Straw or skewer
- Metallic or pearl acrylic paints (optional)
- Ribbon or string
How to Make:
- Roll out the clay evenly on a flat surface.
- Press your chosen texture gently into the surface using fabric or a patterned rolling pin.
- Cut out your ornament shapes.
- Create a hole for hanging, then set aside to dry 24–48 hours.
- Once dry, lightly brush metallic paint across the raised areas to highlight the texture.
- Thread ribbon or string through the hole.
Style Tip:
Group these ornaments in monochrome tones—white, champagne, and soft gold—for a luxurious, cohesive look that feels high-end but handmade.
4. Mini Clay Houses or Trees
Add a whimsical, storybook feel to your holiday décor with tiny clay houses or Christmas trees. These charming mini sculptures can stand alone on a mantel, form part of a tabletop village, or hang as dimensional ornaments.
Supplies:
- Air dry clay
- Craft knife or sculpting tools
- Small rolling pin
- Paintbrushes and acrylic paints (white, green, tan, gold, or pastel tones)
- Optional: fine glitter, matte sealer, or faux snow
How to Make:
- Roll out the clay to about ¼ inch thick for flat designs, or shape small three-dimensional forms by hand.
- For houses: cut out simple rectangles with triangle roofs; for trees, shape cones or layered tiers.
- Use a toothpick or clay tool to carve door and window details.
- Let dry completely for 24–48 hours.
- Paint in soft, neutral, or pastel tones, adding white accents for “snow” or metallic trim for sparkle.
- Seal lightly if you want a smooth, lasting finish.
Style Tip:
Group these miniatures with fairy lights or bottlebrush trees to create a magical tabletop display. They also make adorable gift toppers or stocking stuffers for loved ones who enjoy handmade touches.
5. Air Dry Clay Garland
Transform simple clay shapes into a festive garland that you can drape across your mantel, staircase, or window frame. It’s an easy way to bring cohesion to your décor while showcasing your handmade ornaments.
Supplies:
- Air dry clay
- Rolling pin
- Cookie cutters (stars, trees, circles, snowflakes, etc.)
- Straw or skewer for holes
- Twine, jute string, or thin ribbon
- Optional: beads, dried oranges, or greenery sprigs for accents
How to Make:
- Roll out the clay to about ¼ inch thick and cut out your desired shapes.
- Use a straw or skewer to make two small holes near the top edge of each piece (for threading).
- Let the shapes dry flat for 24–48 hours.
- Once hardened, gently sand any rough edges if needed.
- Paint or leave natural, then thread onto twine, alternating with wooden beads or greenery for texture.
- Hang across a mantel or shelf for a cozy, handmade holiday statement.
Style Tip:
Mix clay stars and snowflakes with small pinecones or gold beads for a rustic-meets-elegant look. Try stringing shorter versions to wrap around gifts or use as mini wreaths.
6. Candle Holders & Table Accents
Air dry clay isn’t just for tree décor—it also makes lovely tabletop pieces like tealight holders, napkin rings, or mini plates for displaying ornaments. These simple accents add a handmade touch to your holiday table or mantle vignette.
Supplies:
- Air dry clay
- Rolling pin
- Small bowl or circular mold
- Tealight candles (battery or wax)
- Optional: metallic paint, sealant spray, or texture tools
How to Make:
- Roll out clay to ¼-inch thickness.
- Cut circles or organic shapes, and gently mold over the bottom of a small bowl to create shallow dish forms.
- For candle holders, press a tealight into the clay to form an indent.
- Allow to dry fully (24–48 hours), then paint or leave raw for a minimalist look.
- Finish with a matte or satin sealer.
Style Tip:
Use these small dishes to display ornaments, hold candles, or accent your holiday place settings. Try soft blush, cream, or metallic finishes for a cohesive, elegant tablescape.
7. Stamped or Painted Clay Gift Tags
Upgrade your gift wrapping this year with reusable clay tags—each one can be stamped, painted, or lettered for a polished handmade touch. These double beautifully as ornaments once the gifts are opened.
Supplies:
- Air dry clay
- Rolling pin
- Small tag or rectangle cookie cutter
- Alphabet stamps or rubber holiday stamps
- Acrylic paint or paint pens
- Ribbon or twine
How to Make:
- Roll out clay and cut into tag-shaped rectangles or ovals.
- Stamp names, initials, or small festive designs onto the surface.
- Use a straw to create a small hole for threading.
- Let dry fully, then paint details or edges.
- Tie to wrapped presents using coordinating ribbon.
Style Tip:
Create a cohesive look by matching your clay tags to your wrapping palette—like kraft paper and white twine for a natural theme, or jewel tones with metallic ink for a luxe vibe.
Troubleshooting & Tips for Best Results
1. Cracking or Curling:
If your clay pieces crack as they dry, they may have been rolled too thin or dried too quickly. Keep the clay at least ¼ inch thick and let it dry naturally at room temperature—avoid placing near heat or sunlight. For slight cracks, use a bit of damp clay as “filler” and smooth gently before it hardens.
2. Sticking to the Surface:
Dust your surface lightly with cornstarch or roll the clay between parchment sheets to prevent sticking. Silicone mats also work well for easy cleanup.
3. Uneven Drying:
Flip larger ornaments halfway through drying to avoid warping. Make sure they’re on a flat, breathable surface like a mesh tray or parchment paper.
4. Paint Peeling:
Always let clay dry completely before painting. For the best adhesion, use acrylic paints and seal with a matte or satin varnish.
5. Storage:
Store leftover clay in an airtight container or zip bag with a damp paper towel to keep it soft for future use.
For more tips, check out this post on Air Dry Clay tips for professional-looking projects!
FAQ
Q: Can I bake air dry clay to make it harden faster?
No—air dry clay is designed to cure naturally and may crack if heated. For faster results, place pieces in a warm, dry spot with good air circulation.
Q: How can I make my ornaments more durable?
Seal them with a thin coat of matte or satin acrylic sealer. This helps protect against moisture and gives a finished, professional look.
Q: What kind of paint works best on air dry clay?
Acrylic paint is ideal—it adheres well, dries quickly, and comes in a wide range of finishes. Metallic, pearl, and chalk paints all look beautiful on holiday pieces.
Q: Can kids help with these projects?
Yes! Air dry clay is great for supervised family crafting. Children can roll, cut shapes, and add textures—just handle the drying and painting steps carefully.
Q: How should I store the finished pieces?
Keep ornaments wrapped in tissue or bubble wrap in a dry container between seasons to prevent chips or moisture damage.
Conclusion
Air dry clay is one of the easiest and most rewarding materials for DIY holiday décor. With just a few basic tools, you can create ornaments, garlands, and tabletop pieces that feel elegant, personal, and completely handmade. Each project can be customized with colors, textures, or finishes that match your holiday theme—whether you love cozy neutrals, metallic shimmer, or playful pastels.
Set aside an afternoon to craft your collection, involve the kids, and let creativity guide you. When you hang your finished pieces on the tree or place them on your mantel, you’ll have décor that feels uniquely yours—crafted with care, and full of the season’s spirit.