Introduction
Once December hits, there’s something undeniably magical about counting down to Christmas — each day leading up to the 25th holds a spark of anticipation, tradition, and joy. Advent calendars have evolved far beyond cardboard windows with chocolates; today, they’re a cherished part of holiday home decor — an opportunity to create something beautiful, meaningful, and lasting.
In this post, we’re sharing six cozy and traditional DIY Advent calendar ideas that blend timeless charm with elegant design. These projects aren’t just fun to craft — they’ll become a heartwarming focal point in your holiday home, whether displayed on a mantel, hung along a staircase, or styled on a sideboard with evergreen boughs and candlelight.
By the end of this post, you’ll have inspiration and step-by-step guidance to create an Advent calendar that feels personal, refined, and deeply festive — a countdown that celebrates both craftsmanship and the quiet joy of the season.
1. Affordable & Adorable Cardboard Cabin DIY Advent Calendar
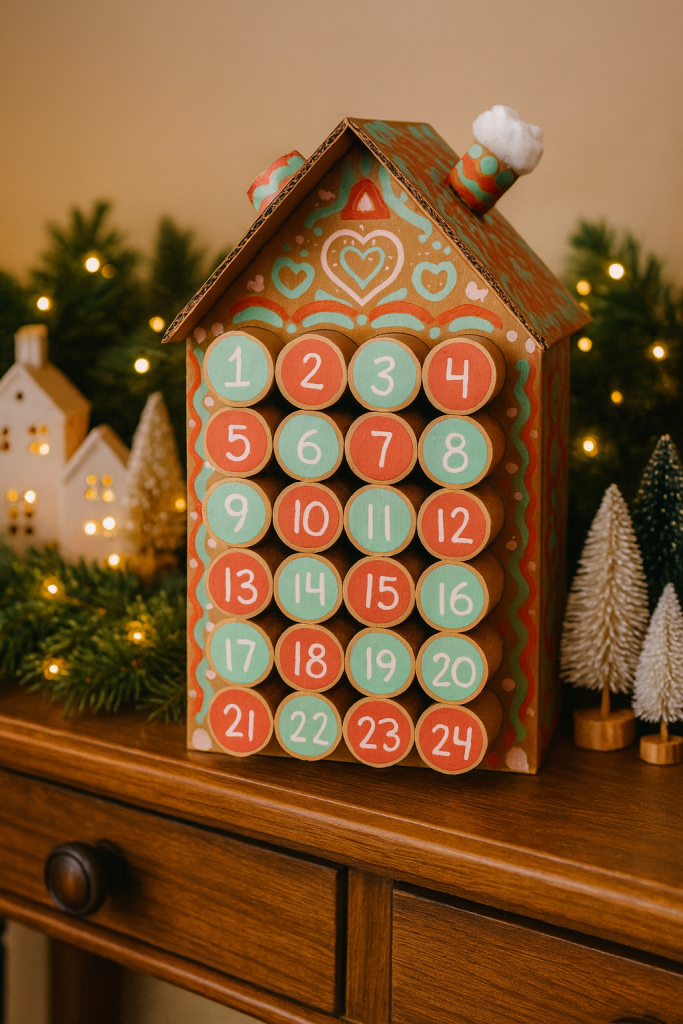
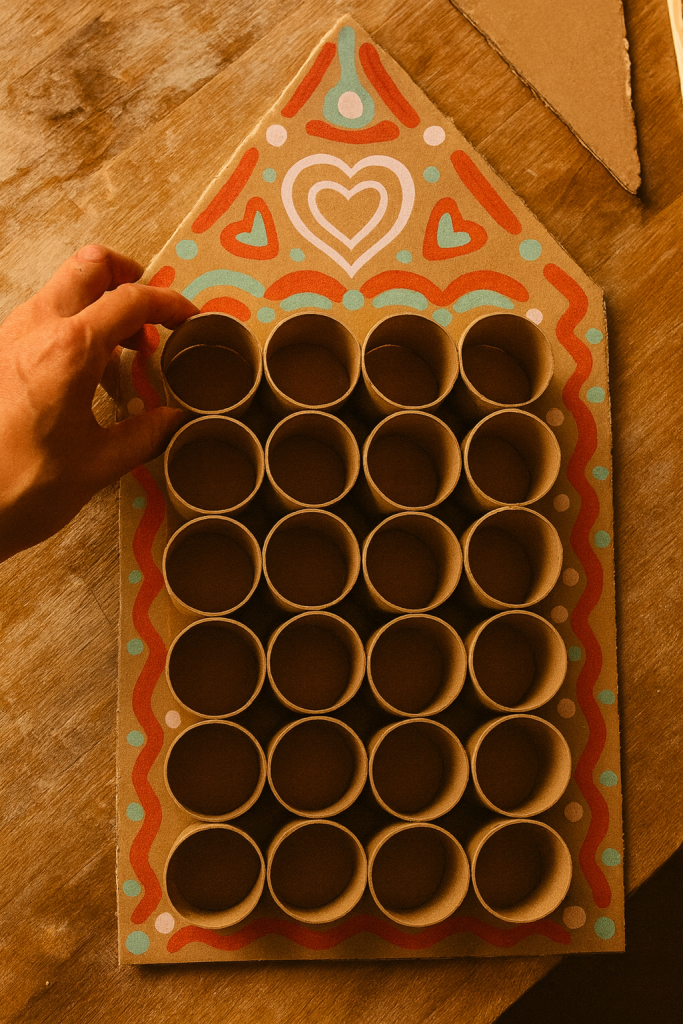
If you’re looking for a beautiful Advent calendar that’s budget-friendly, eco-conscious, and surprisingly charming, this cardboard + toilet paper roll house calendar is the perfect project. It uses materials you likely already have at home — cardboard, paper rolls, a glue gun, and a little creativity — yet the finished piece looks warm, handmade, and delightfully nostalgic.
How to Make It
- Prepare the Rolls
- Collect 24 empty toilet paper rolls.
- Make sure each one is trimmed evenly and stands flat.
- You can leave them natural for a warm kraft-paper look or paint them white for a snowy cottage feel.
- Create the House Backing
- Cut a large piece of cardboard into a simple house silhouette: a rectangular base with a triangular roof.
- Score the fold lines gently with scissors if you want crisp edges.
- Optional: Cut and attach a second piece of cardboard to create the roof overhang, or add a small paper “chimney.”
- Assemble the Calendar
- Arrange the toilet paper rolls in rows of four, creating a neat grid of 24 compartments.
- Glue the rolls tightly together and then adhere the entire structure to the cardboard house backing.
- Once secure, write or stencil numbers 1–24 on the front of each roll.
- Fill each roll with candies, activity slips, tiny gifts, or festive daily prompts.
- Add Finishing Touches
- Glue cotton or batting to the chimney for a whimsical “smoke” detail.
- Trace decorative lines, hearts, or flourishes on the cardboard with white marker for a gingerbread-house vibe.
- Display your finished house on a tabletop or hang it using a small ribbon loop glued to the back.
2. Linen Pocket Garland Advent Calendar
If your holiday style leans toward understated elegance, a linen pocket garland is a timeless and beautiful way to count down the days of Advent. Soft, natural fabrics, wooden accents, and a muted palette bring warmth and sophistication to your holiday decor — perfectly suited for traditional homes or anyone craving a cozy, handmade touch.
How to Create It
- Make the Pockets:
- Cut 24 rectangles of linen or muslin, roughly 4×6 inches each.
- Fold each in half (right sides together), sew or glue the sides, and turn inside out.
- Hem the top edge for a finished look or fold it down for a simple cuff.
- Number each pouch using stenciled fabric paint, embroidered numbers, or iron-on transfers. For an elegant touch, try hand-stamping gold numbers using metallic ink.
- Assemble the Garland:
- Stretch a 6–8 foot length of jute twine, velvet ribbon, or linen cord.
- Clip the pouches evenly across the string using miniature wooden clothespins or small brass clips.
- Fill each pouch with small tokens of the season — think wrapped truffles, dried orange slices, tiny ornaments, or handwritten notes with acts of kindness.
- Add Finishing Details:
- Weave in fresh or faux greenery (cedar, pine, or eucalyptus) for a lush look.
- Incorporate fairy lights along the garland for a gentle, evening glow.
- Layer the piece with beaded garlands or velvet bows for added texture.
Style Variations
- Classic Cottage Style: Use cream linen, red embroidery thread, and gingham ribbon. Add cinnamon sticks or dried berries for rustic charm.
- Scandinavian Minimalist: Stick with soft gray or ivory linen, minimalist black numbers, and simple pine sprigs. Display it against a white wall or window for a calm, wintry look.
- Heritage Luxe: Choose rich velvet ribbon in forest green or cranberry, gold leaf number tags, and delicate satin ties for an elevated, heirloom-quality display.
Recommended Tools & Materials
- Linen or muslin fabric (½ yard)
- Fabric scissors and measuring tape
- Sewing kit or hot glue gun
- Number stencils, stamps, or embroidery thread
- Mini clothespins or brass clips
- Jute twine or velvet ribbon
- Greenery and optional fairy lights
Pro Tip:
Create an “evergreen garland base” that you reuse each year — simply swap out the pouches for new color schemes or themes. This small investment turns one DIY project into a cherished annual tradition.
Why This Project Works So Well
- Ultra-affordable — made from materials found around the house.
- Sustainable — reuses cardboard and tubes that would normally be discarded.
- Kid-friendly — simple steps make it a great family craft.
- Customizable — change the house shape, add windows, paint it white, or decorate it like a gingerbread cottage.
Pro Tip
If you want each day to be a surprise, glue a thin sheet of kraft paper over the front of each roll before numbering them. Each morning, kids can punch through the paper flap to reveal the treat inside — adding a playful, interactive moment to the countdown.
3. Hanging Ornament Ladder Advent Calendar
A hanging ladder Advent calendar is a beautiful way to combine rustic charm with elegant presentation. This display adds vertical interest — perfect for narrow wall spaces, beside a fireplace, or even in an entryway where guests can admire it as soon as they walk in. The mix of natural wood, metallic ornaments, and cozy ribbon makes it feel both festive and timeless.
How to Create It
- Prepare the Ladder Base:
- Find or make a wooden ladder — you can use an old decorative ladder, a thrifted find, or even create one using dowels and twine.
- Sand lightly and stain or paint it in a color that matches your home’s palette — think natural pine, warm oak, or creamy white.
- Create the Ornaments:
- Collect 24 small ornaments, fabric sachets, or gift tags to hang on each rung.
- Number each one from 1–24 with gold paint pens, vinyl decals, or small number charms.
- Fill the ornaments or attach tags with a mix of tiny treats and heartfelt messages.
- Assemble and Style:
- Hang each ornament with velvet ribbon or linen string in varying lengths for a layered look.
- Add sprigs of evergreen, pinecones, or dried orange slices along the sides for a traditional touch.
- Wrap a string of warm fairy lights around the rungs to create a soft, festive glow.
Style Variations
- Nordic Natural: Use whitewashed wood, linen ribbon, and wooden ornaments for a serene Scandinavian feel.
- Classic Red & Green: Combine tartan ribbon, red glass ornaments, and touches of gold for timeless Christmas warmth.
- Elegant Metallics: Use a mix of matte gold, champagne, and silver ornaments with silk ribbon for a refined, glowing display.
Recommended Tools & Materials
- Wooden ladder or dowels
- Ornaments, sachets, or numbered tags
- Velvet or linen ribbon
- Hooks, twine, or floral wire
- Optional: greenery, lights, pinecones
Pro Tip:
Anchor your ladder with a weighted base (like a basket filled with pinecones or logs) if you’re displaying it freestanding. This not only stabilizes it but adds a layered, styled look that’s perfect for photography or Pinterest-worthy displays.
4. Envelope Wall Advent Calendar Display

For a sophisticated and space-saving option, a wall-mounted envelope Advent calendar blends beautifully with traditional or modern interiors alike. This design combines elegant stationery, fine textures, and simple wall styling — perfect for anyone who loves a polished, timeless presentation.
How to Create It
- Choose Your Envelopes:
- Select 24 high-quality envelopes in coordinating tones — think cream, ivory, kraft paper, or soft metallics.
- Add wax seals, embossed numbers, or calligraphy-style labels for an upscale finish.
- Inside each envelope, place a small note, Scripture verse, family activity, or photo memory — making this project deeply personal and meaningful.
- Design the Layout:
- Arrange the envelopes on a linen-covered bulletin board, large picture frame, or directly on the wall using removable adhesive dots.
- Lay them out in neat rows or in a Christmas tree shape for visual interest.
- If you prefer dimension, tie small bows or clip mini ornaments on each envelope with decorative pins.
- Add the Finishing Touches:
- Frame the display with evergreen garland, twinkle lights, or dried floral accents for warmth.
- Use velvet ribbon borders in rich seasonal tones like burgundy, forest green, or gold.
Style Variations
- Classic Heritage: Use cream envelopes with red wax seals and handwritten script.
- Gilded Luxe: Choose champagne envelopes, gold calligraphy, and metallic clips.
- Rustic Cottage: Layer kraft envelopes with gingham ribbon and evergreen sprigs.
Recommended Tools & Materials
- 24 decorative envelopes
- Adhesive dots or push pins
- Wax seal kit or gold number stickers
- Bulletin board, frame, or wall space
- Ribbon, twine, or fairy lights
Pro Tip:
If you’re short on space, use a narrow vertical layout with envelopes arranged in cascading tiers. It’s an elegant way to add a festive focal point without overwhelming your walls — especially in hallways or apartment settings.
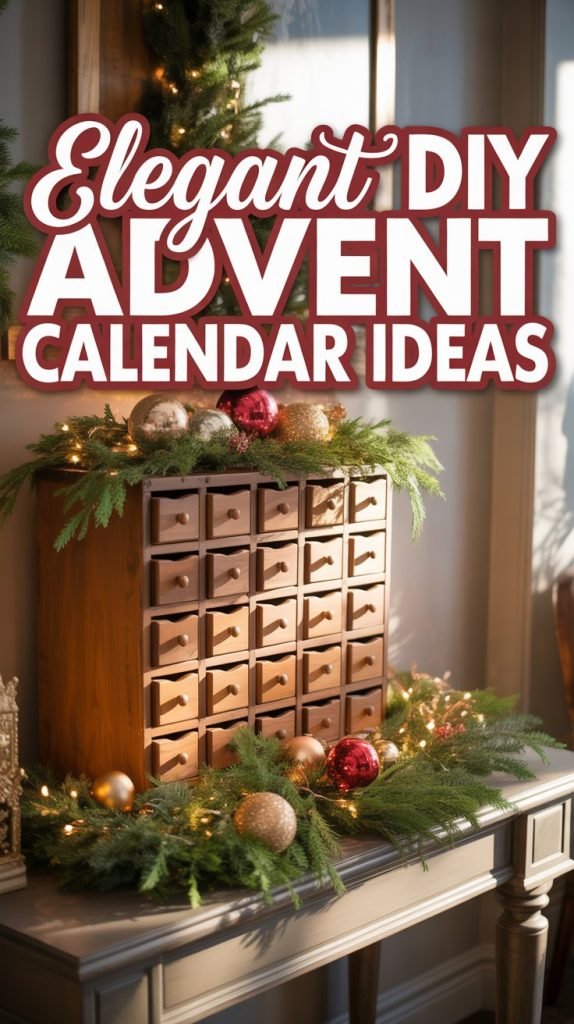
5. Mini Drawer Cabinet Advent Calendar
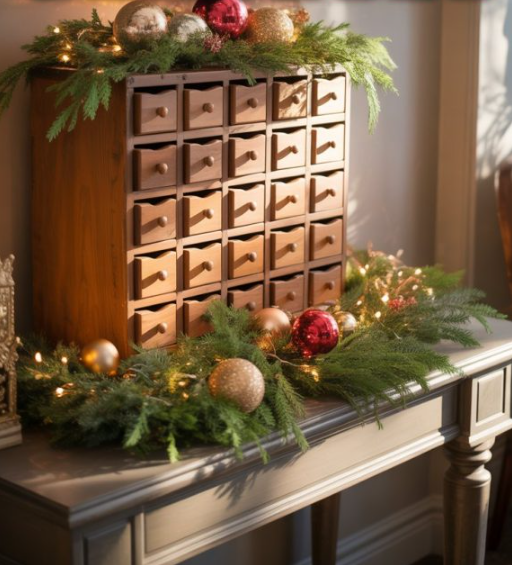
There’s something wonderfully nostalgic about opening tiny drawers each day in December. A mini drawer cabinet Advent calendar brings old-world charm to your decor and offers endless opportunities for customization. Whether you use a repurposed apothecary chest or a new unfinished wood cabinet, the finished piece becomes a stunning heirloom display year after year.
How to Create It
- Find or Build Your Base:
- Start with a wooden drawer cabinet, mini apothecary chest, or unfinished craft organizer (many craft stores carry 24- or 25-drawer versions).
- Sand the surfaces lightly, then paint or stain in warm neutrals — think soft ivory, natural pine, or chestnut brown.
- Add Number Details:
- Number each drawer 1 through 24 using brass tacks, rub-on transfers, or painted stencils.
- For a traditional feel, use gold script or white chalk paint; for a more rustic look, stamp numbers with black ink onto aged paper labels.
- Decorate and Fill:
- Line the drawer fronts with patterned paper, sheet music, or fabric swatches for texture.
- Fill each drawer with little surprises — chocolates, ornaments, or heartfelt notes.
- Add finishing touches like tiny wreaths, bells, or miniature pinecones glued to select drawer fronts for extra charm.
Style Variations
- Traditional Heirloom: Stained wood finish with gold numbers and evergreen accents.
- French Country: Chalk-painted in antique white with lace drawer pulls.
- Rustic Lodge: Dark walnut stain with plaid paper liners and jute bows.
Recommended Tools & Materials
- Mini drawer cabinet or wooden chest
- Paint or stain
- Number decals or stencils
- Small ornaments, chocolates, or messages
- Craft glue, brush, and decorative paper
Pro Tip:
This project can become a family keepsake — consider assigning each family member a drawer to personalize each year. Over time, the piece will hold sentimental value as much as style.
6. Gift Box Tree Advent Calendar
If you love a display that feels both grand and heartwarming, the Gift Box Tree Advent Calendar is the perfect showstopper. Arranged in a Christmas tree silhouette, these wrapped boxes make a breathtaking statement on a sideboard, console, or even beneath your actual tree. It’s equal parts decor and daily delight.
How to Create It
- Prepare the Boxes:
- Collect or purchase 24 small gift boxes in varying sizes. Choose sturdy ones with lids or use recycled jewelry boxes, matchboxes, or paper mâché boxes.
- Wrap each box in coordinating papers — rich plaids, metallic foils, or kraft paper with satin ribbons — to suit your home’s color palette.
- Number each box 1–24 using calligraphy-style tags, embossed stickers, or tied-on numbered ornaments.
- Arrange the Tree Shape:
- Lay out your boxes in a tiered pyramid shape (starting with six boxes at the base and one at the top).
- Secure them together using removable adhesive dots or double-sided tape to prevent slipping.
- Top your “tree” with a star ornament or ribbon bow for a festive finishing touch.
- Fill with Surprises:
- Add thoughtful treats — individually wrapped candies, small gifts, or handwritten daily prompts like “light the candles,” “bake cookies,” or “watch a Christmas movie.”
- For a grown-up version, tuck in items like tea sachets, mini candles, or self-care notes.
Style Variations
- Classic Red & Green: Mix plaid wrapping, deep red ribbons, and gold tags for timeless tradition.
- Elegant Metallics: Use silver, gold, and ivory paper with silk ribbon and pearl accents for a refined glow.
- Natural Neutrals: Combine kraft paper, twine, and pressed greenery for a Scandinavian-inspired organic look.
Recommended Tools & Materials
- 24 gift boxes in assorted sizes
- Coordinating wrapping paper
- Ribbon, twine, or fabric scraps
- Adhesive dots or tape
- Number tags or stickers
Pro Tip:
For a memorable presentation, arrange the box tree on a cake stand or wooden tray surrounded by candles or greenery. It becomes both a countdown and a centerpiece — ideal for elegant entertaining spaces.
Frequently Asked Questions: DIY Advent Calendars
1. What materials work best for a long-lasting Advent calendar?
Durable materials like linen, wood, muslin, or thick cardstock tend to hold up beautifully over time. Avoid thin paper or inexpensive adhesives if you plan to reuse your calendar year after year.
2. How early should I start making my Advent calendar?
Ideally, start crafting in early to mid-November. This allows time for materials to arrive, paint or glue to dry, and finishing touches like ribbon or greenery to be styled before December 1st.
3. What can I fill my Advent calendar with besides candy?
Plenty! Try mini ornaments, handwritten notes, holiday quotes, Scripture verses, cozy activity prompts, or self-care treats like tea sachets or bath salts. For families, add simple daily challenges such as “donate a toy” or “bake cookies together.”
4. How can I make my Advent calendar look cohesive with my decor?
Pick a color palette that reflects your home’s existing holiday scheme (for example: ivory, sage, and gold for traditional elegance). Repeat those tones through your paper, fabric, and ribbons to keep the look unified.
5. Can I make an Advent calendar that’s reusable every year?
Absolutely. Opt for sturdy, non-disposable bases such as wooden crates, fabric pouches, or mini drawer chests. Store numbered tags separately and refresh the contents each year to keep the tradition fresh.
6. How do I hang or display my Advent calendar safely?
For wall-mounted or garland styles, use removable adhesive hooks or Command strips that can handle the calendar’s weight. Avoid using nails or heavy adhesives on delicate surfaces. Always check balance and weight distribution before filling it.
7. I don’t have much space — what are good compact options?
Try a wall-mounted envelope calendar, a small crate display, or a mini gift box stack. These take up little room but still offer all the festive charm.
8. How can I make the countdown more meaningful?
Include daily notes focused on gratitude, kindness, or family time — for example, “Write a thank-you card,” or “Call a loved one.” These small, intentional moments make your Advent experience richer and more memorable.
Troubleshooting & Common Mistakes When Making DIY Advent Calendars
Even the most creative holiday projects come with a few challenges — especially when you’re juggling glue guns, ribbons, and twenty-four tiny compartments. Below are the most common mistakes home decorators encounter when crafting Advent calendars, plus simple fixes for each.
1. Uneven Spacing or Alignment
The Problem: Garlands sag, envelopes tilt, or boxes don’t line up neatly.
The Fix:
- Before hanging or gluing, lay out all components on a flat surface and measure equal spacing.
- Use painter’s tape as a visual guide when hanging garlands or envelopes on walls.
- If working with boxes, create a cardboard backing template to keep everything symmetrical.
2. Overly Heavy or Unstable Displays
The Problem: Ladder calendars tip forward or wall-mounted versions fall due to excess weight.
The Fix:
- Balance the weight of items evenly and keep treats lightweight (notes, paper ornaments, small trinkets).
- For ladder or garland styles, anchor ends with small nails, Command hooks, or fishing line for support.
- Use sturdy bases like baskets, crates, or trays to visually and physically stabilize your display.
3. Fragile or Messy Finishes
The Problem: Glue drips, uneven paint, or materials fray at the edges.
The Fix:
- Always test paint and glue on scrap material first.
- Use fabric glue sparingly and trim edges with pinking shears to prevent fraying.
- For wooden pieces, seal with a clear coat to preserve finishes and prevent splinters.
4. Overcrowded or Visually Busy Designs
The Problem: Too many patterns or decorations make the display look cluttered rather than cohesive.
The Fix:
- Choose a limited color palette (3–4 colors) and repeat them throughout.
- Balance decorative details with plenty of negative space.
- Use consistent numbering — one font, finish, or size keeps everything unified.
5. Lack of Reusability
The Problem: Some materials don’t hold up year after year.
The Fix:
- Choose durable materials like linen, wood, or sturdy paperboard.
- Store your Advent calendar components in labeled boxes to keep them safe and organized.
- For paper-based calendars, consider laminating number tags or using reusable cloth pouches.
6. Losing the Personal Touch
The Problem: The calendar looks beautiful but feels generic.
The Fix:
- Include handwritten notes, family traditions, or faith-based messages that reflect your household.
- Personalize the design with your family’s initials, monograms, or favorite Christmas carols.
- Remember: Advent is about joy and togetherness — the charm lies in imperfection and love, not perfection.
Next Steps & Pro Tips for Elevating Your DIY Advent Calendar
Once you’ve created your Advent calendar, you can make it even more meaningful and beautiful with a few thoughtful upgrades. These next steps are perfect for readers who want to refine their craftsmanship, incorporate family traditions, or create a display worthy of annual use and admiration.
1. Establish a Theme for Each Year
Instead of repeating the same items every season, consider giving your Advent calendar a fresh theme annually — such as “Comfort & Joy,” “Kind Acts,” or “A Taste of Christmas.” This keeps the tradition new and inspiring.
Pro Tip: Print themed activity cards that match your home’s color palette — they make every daily reveal cohesive and photo-ready.
2. Upgrade Your Materials for Longevity
If you start with paper or lightweight fabric, consider upgrading to linen, canvas, or wood next year. These materials can withstand storage, handling, and time — making your Advent calendar an heirloom piece.
Pro Tip: Apply a clear matte finish (like Mod Podge or wood sealant) to protect painted numbers and surfaces.
3. Personalize with Family History
Add a sentimental touch by incorporating family recipes, vintage ornaments, or photos from holidays past. It turns the countdown into a journey through memory and meaning.
Pro Tip: If you have children, include a “memory tag” each year where they can write a favorite holiday moment. Store these in a keepsake box for the following Christmas.
4. Coordinate with Your Decor Style
Your Advent calendar can double as a design statement. Align it with your existing holiday aesthetic — traditional, cottage, or vintage — by echoing your tree ornaments, ribbon textures, and metallic finishes.
Pro Tip: Group your Advent calendar with complementary decor (candles, evergreen branches, or framed Christmas art) to create a styled vignette that feels intentional and complete.
5. Document and Share Your Work
Part of the joy of DIY is sharing the inspiration. Photograph your finished calendar in natural light, stage it with cozy accents like candles or cocoa mugs, and post your creation online or print the images for a holiday scrapbook.
Pro Tip: Label your calendar discreetly with the year — you’ll love looking back at your evolving designs in seasons to come.
Conclusion: Crafting Joy, One Day at a Time
Creating your own Advent calendar is more than a holiday craft — it’s an invitation to slow down, savor small moments, and fill your home with the spirit of anticipation. Each ribbon tied, envelope sealed, and drawer opened becomes part of a heartfelt ritual that celebrates both beauty and meaning.
Whether you’ve chosen linen pockets, vintage crates, or a tree of gift boxes, these DIY Advent calendar ideas blend cozy tradition with timeless elegance. They remind us that Christmas isn’t about extravagance — it’s about creativity, connection, and the warmth of handmade touches that tell your story.
So this season, light the candles, gather your supplies, and craft your countdown with intention. Because in every detail — from the scent of fresh pine to the glimmer of gold ribbon — you’re not just decorating your home… you’re building memories that will last for Christmases to come.