Introduction: Bring Your Pumpkin Carving to the Next Level
Pumpkin carving is one of the most beloved fall traditions—and it’s easy to see why. There’s something magical about transforming a simple pumpkin into a glowing masterpiece that lights up your porch, living room, or Halloween display. Beyond the fun of carving, pumpkins offer a chance to express creativity, bond with family and friends, and bring a cozy, festive spirit into your home.
Whether you’re a seasoned carver or trying it for the first time, this guide will spark your imagination with 10 spooky and fun pumpkin carving ideas that go beyond the classic jack-o’-lantern. From glittery glam pumpkins to mini haunted houses, each idea comes with practical tips, tricks for clean and safe carving, and creative inspiration to make your pumpkins stand out. By the end, you’ll have everything you need to create eye-catching pumpkins that delight both kids and adults—and maybe even inspire your neighbors to do the same.
Ready to carve your way to Halloween magic? Let’s dive in.
Section 1: Classic Jack-o’-Lantern with a Twist
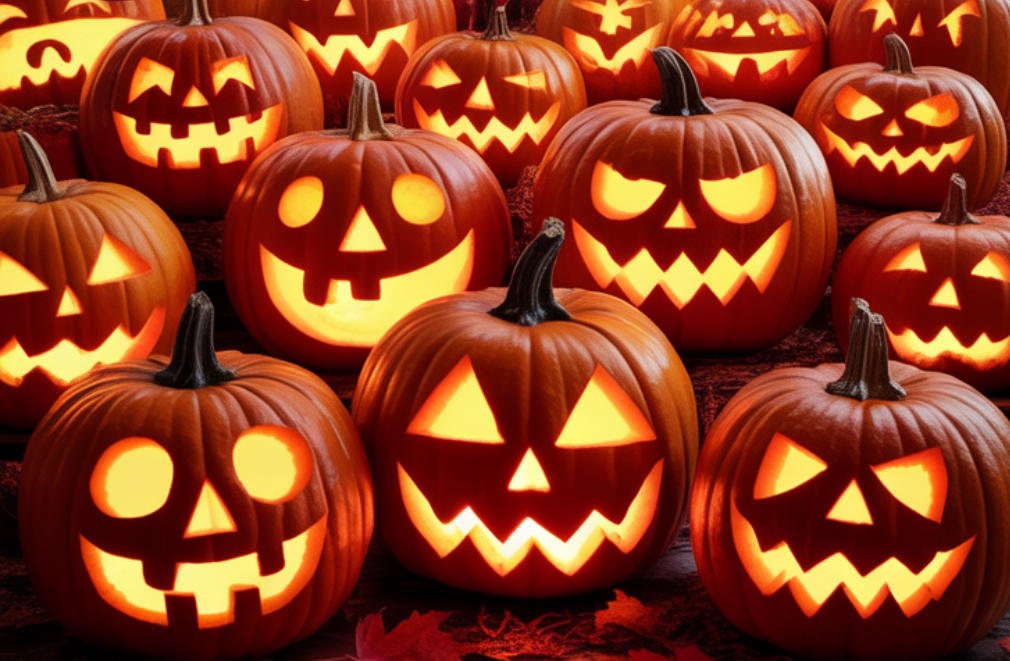
The classic jack-o’-lantern is timeless, but adding your own spin makes it fresh and memorable. Instead of the standard triangle eyes and toothy grin, experiment with asymmetrical shapes, exaggerated expressions, or layered features. Think winking eyes, mischievous smiles, or even double-layered mouths for extra depth.
Tips for Success:
- Choose the Right Pumpkin: Select one with a smooth, even surface for easier carving and cleaner lines.
- Prep Your Pumpkin Properly: Remove seeds and scrape the inner walls to about an inch thickness for smoother carving.
- Use Safe Tools: A basic pumpkin carving kit works best, but small serrated knives or linoleum cutters can create fine details safely.
Bonus Tip: Light your jack-o’-lantern with an LED tea light instead of a candle to avoid smoke or fire hazards while keeping it glowing all night.
Section 2: Creepy Crawly Critters
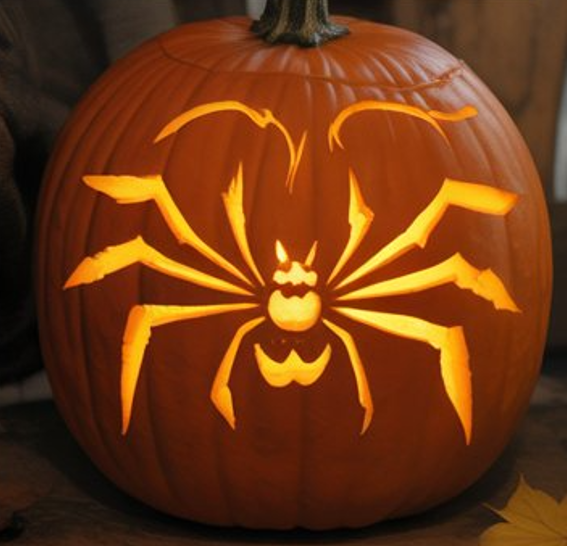
For a spooky twist, turn your pumpkin into a home for creepy critters like spiders, bats, owls, or insects. Small, intricate shapes make your pumpkin look delightfully eerie, perfect for Halloween displays or a child-friendly spooky table centerpiece.
Tips for Success:
- Delicate Carving Tools: Use fine-tipped saws, craft knives, or X-Acto knives to carve tiny legs, wings, or claws.
- Pumpkin Stability: Place your pumpkin on a non-slip surface or hold it in a shallow bowl while carving to prevent slipping.
- Add Dimension: Use toothpicks or small sticks to attach extra pumpkin pieces (like bat wings) for 3D effects.
Extra Touch: Spray a little black acrylic paint on carved areas to enhance the contrast and make the critters “pop” in the light.
Section 3: Pop Culture Pumpkins
Bring your favorite movies, TV shows, or video game characters to life on your pumpkin. From classic monsters to modern superheroes or whimsical animated characters, pop culture pumpkins are instantly recognizable and can be a conversation starter at any Halloween party.
Tips for Success:
- Stencil It Out: Print a character silhouette, tape it to the pumpkin, and trace the design using a pin or poker tool for accuracy.
- Layer Your Design: Use shallow and deep cuts to create shadows and highlights, adding realism and depth.
- Don’t Fear Paint: Some intricate designs may benefit from a little acrylic paint for eyes or fine details that carving alone can’t capture.
Pro Tip: Look online for free pumpkin carving templates—they can save time and give beginners confidence when tackling more detailed characters.
Section 4: Glitter and Glam Pumpkin
Pumpkin carving doesn’t have to be spooky to stand out. Adding glitter, metallic paint, or gemstones turns your pumpkin into a dazzling centerpiece. Patterns like stars, swirls, or even geometric shapes can take a standard pumpkin to glam status.
Tips for Success:
- Prep and Seal: After carving, apply a thin layer of clear craft glue or Mod Podge to the areas you want to glitter. This helps it stick and last longer.
- Choose the Right Materials: Use fine glitter for intricate designs and larger chunky glitter for bold accents. Metallic paints can also add shimmer without the mess.
- Layer Carefully: Let each coat of glitter or paint dry before adding additional layers to prevent clumping or smudging.
Extra Touch: Add small LED lights inside to reflect off the glitter for a magical, glowing effect.
Section 5: Haunted House or Landscape Scenes
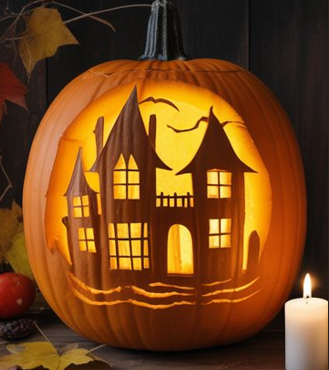
Turn your pumpkin into a miniature scene. A haunted house, graveyard, or forest silhouette carved into the pumpkin creates dramatic shadows and a storybook effect. This idea is perfect for creating a “wow” factor on your porch or as part of a Halloween tablescape.
Tips for Success:
- Plan Your Layers: Sketch your scene first, keeping in mind foreground and background details to create depth.
- Use Varying Depths: Shallow cuts allow light to filter through for subtle effects, while deeper cuts make bold outlines.
- Backlight Strategically: Use candles, LED tea lights, or small string lights to enhance the silhouette and give your scene a glowing, eerie look.
Pro Tip: Consider using multiple pumpkins to extend your scene—stack them or line them up to create a full haunted street effect.
Section 6: Pattern Play – Geometric and Abstract Designs
For a modern, chic approach, try geometric or abstract carvings. Triangles, stripes, chevrons, polka dots, and asymmetrical shapes create a stylish, minimalistic look while still embracing the Halloween spirit.
Tips for Success:
- Draw Before You Cut: Use a pencil or washable marker to outline your pattern for precision.
- Steady Hands & Tools: Small serrated knives, craft saws, or linoleum cutters make clean, straight lines easier to achieve.
- Experiment with Light: Carve some shapes all the way through and leave others shallow to play with shadow, creating visual interest.
Extra Touch: Pair abstract pumpkins with simple votive candles or a monochromatic display to emphasize modern style.
Section 7: Word Play Pumpkins
Carving words or phrases adds a playful, personalized touch to your Halloween display. Simple sayings like “Boo!”, “Trick or Treat”, or a family nickname turn your pumpkin into a message board that’s fun and festive.
Tips for Success:
- Use Letter Stencils: Print out your chosen font, tape it to the pumpkin, and trace with a poker tool for precise lettering.
- Mind Your Spacing: Keep letters evenly spaced and large enough to carve without collapsing the pumpkin walls.
- Combine Carving and Paint: For extra flair, carve the letters and fill them with contrasting paint or metallic markers to make them stand out.
Pro Tip: Mix fonts or styles for emphasis—like bold words paired with cursive script—for a visually dynamic pumpkin.
Section 8: Glow-in-the-Dark Pumpkins
Take your pumpkin display to the next level by adding glow-in-the-dark elements. Glow paint, sticks, or LED lights create an eye-catching effect that’s perfect for evening displays and parties.
Tips for Success:
- Prep Surface: Clean the pumpkin thoroughly before applying glow paint to ensure even coverage.
- Layer Materials: Apply glow paint in thin layers, allowing each to dry for maximum luminosity.
- Use LED or Battery-Powered Lights: Instead of candles, LED tea lights or string lights enhance glow effects safely and evenly.
Extra Touch: Carve a design and fill certain sections with glow paint to make patterns “pop” when the lights go down.
Section 9: Multi-Pumpkin Displays
Don’t limit yourself to a single pumpkin! Cluster multiple pumpkins to create scenes, stack them for height, or mix sizes and colors for a visually dynamic display.
Tips for Success:
- Plan Composition: Place larger pumpkins at the back or bottom and smaller pumpkins toward the front or top for balance.
- Secure Stacking: Use dowels, toothpicks, or wooden skewers to stabilize stacked pumpkins.
- Mix Designs: Combine carved, painted, and glittered pumpkins to create a layered and visually engaging display.
Pro Tip: Add props like miniature tombstones, faux spiders, or autumn leaves to complete your multi-pumpkin scene.
Section 10: Minimalist or Silhouette Carving
Sometimes, less is more. Minimalist carvings or single-feature silhouettes create a clean, modern aesthetic that can complement any home decor. Simple shapes, faces, or even negative space designs are surprisingly striking.
Tips for Success:
- Focus on Clean Lines: Use small, precise carving tools for crisp edges.
- Contrast Matters: Place your minimalist pumpkin near darker backgrounds or pair it with LED lights to make the design stand out.
- Experiment with Shape: A single eye, a moon, or abstract cutouts can be as impactful as intricate designs.
Extra Touch: Minimalist pumpkins work beautifully in clusters or mixed with natural elements like gourds, leaves, and candles.
Troubleshooting & Common Challenges
Even experienced carvers can run into problems—but most have easy fixes. Here are the 5–10 most common pumpkin carving challenges and tips to overcome them:
- Pumpkin Collapsing or Breaking Walls
- Cause: Carving walls that are too thin or overcutting.
- Fix: Keep wall thickness around 1 inch. Avoid cutting too close together; reinforce thin areas with toothpicks if needed.
- Pumpkin Rotting Too Quickly
- Cause: Moisture or bacteria inside the pumpkin.
- Fix: Coat the carved areas with petroleum jelly or a clear acrylic spray to slow drying. Keep pumpkins in a cool, dry place.
- Design Slipping or Smudging
- Cause: Tracing or stencil moving during carving.
- Fix: Secure your stencil with tape and use a poker tool to lightly trace the design before cutting.
- Messy or Jagged Cuts
- Cause: Using dull knives or sawing too quickly.
- Fix: Use sharp serrated knives designed for pumpkin carving. Take your time and cut in a slow, controlled motion.
- Pumpkin Seams or Cracks
- Cause: Stress from stacking or natural pumpkin imperfections.
- Fix: Choose pumpkins without deep cracks. If stacking, use dowels or skewers for support.
- Intricate Designs Are Hard to Carve
- Cause: Small or delicate details can break easily.
- Fix: Use fine carving tools or consider partially shallow cuts for layered effects. Add paint for details that are too small to carve.
- Pumpkin Not Glowing Enough
- Cause: Light source too dim or wall thickness blocking light.
- Fix: Use LED lights or thinner walls behind detailed designs. Carve shallow areas for a softer glow.
- Pumpkins Drying Out Quickly
- Cause: Exposure to air and sun.
- Fix: Mist with water occasionally and keep indoors if possible. Wrap in plastic when not on display to retain moisture.
Frequently Asked Questions (FAQ)
1. How long will a carved pumpkin last?
Typically, a freshly carved pumpkin lasts 3–7 days, depending on temperature and humidity. Cooler weather helps them last longer.
2. Can I use artificial pumpkins?
Yes! Artificial pumpkins are perfect for detailed carving and long-lasting displays. You can paint, carve, and even reuse them year after year.
3. What tools are best for beginners?
A basic pumpkin carving kit is ideal. Small serrated knives, linoleum cutters, or X-Acto knives work well for more intricate designs. Always prioritize safety, especially with children.
4. How can I prevent mold or rot?
Coat the carved areas with petroleum jelly or a clear acrylic spray. Keep pumpkins in a cool, dry place when not on display.
5. Can I combine carving with painting or glitter?
Absolutely! Carving and decorating with paint, glitter, or metallic markers enhances visual interest and adds unique effects.
6. How do I transfer a design onto a pumpkin?
Use stencils, tracing paper, or printouts. Tape the design to the pumpkin, poke small holes along the lines, then carve along the traced outline.
7. How do I make my pumpkin glow more?
Use LED lights or tea lights, carve some sections shallower to let light diffuse, and consider thinner pumpkin walls behind intricate designs.
8. What’s the easiest way to carve intricate designs?
Focus on shallow layered cuts, use fine carving tools, and consider painting small details that are too delicate to cut.
Next Steps & Pro Tips
Once you’ve mastered these 10 pumpkin carving ideas, there are plenty of ways to elevate your creations even further:
- Combine Carving with Painting
- Add metallic accents, watercolor effects, or glowing highlights to bring your pumpkins to life. Layer paint over carved sections for extra dimension.
- Create Themed Displays
- Build a cohesive scene using multiple pumpkins. Combine colors, sizes, and textures, and incorporate props like leaves, faux spiders, or miniature gravestones.
- Preserve Your Pumpkins Longer
- For display longevity, refrigerate carved pumpkins overnight or coat carved areas with a light layer of petroleum jelly. Artificial pumpkins are also great for long-term décor.
- Try Advanced Techniques
- Experiment with layering depths for shadow effects, 3D carvings, or etching designs instead of fully cutting through. These techniques create professional-looking results.
- Involve the Whole Family
- Turn carving into a creative event. Assign different pumpkin designs to each family member, or work together on a multi-pumpkin scene.
- Document and Share Your Creations
- Take photos or create a short video of your pumpkin display. Sharing on Pinterest, Instagram, or your blog can inspire others and keep memories for years to come.
Pro Tip: Keep a carving “tool kit” ready for next year—small saws, carving tools, paint, and stencils can save time and make the process easier every Halloween.
Conclusion
Pumpkin carving is more than just a Halloween tradition—it’s a chance to express creativity, have fun with family and friends, and add a personalized touch to your home decor. From classic jack-o’-lanterns with a twist to glittery glam pumpkins, haunted house scenes, pop culture characters, and minimalist silhouettes, there’s an idea for every skill level and style.
By experimenting with different tools, patterns, and lighting techniques, you can create pumpkins that are not only festive but also striking and memorable. Remember to embrace the process, have fun with each design, and don’t be afraid to mix carving with paint, glitter, or props to make your display truly unique.
This year, let your pumpkins shine and inspire others with your spooky, fun, and creative creations. Happy carving!