Introduction
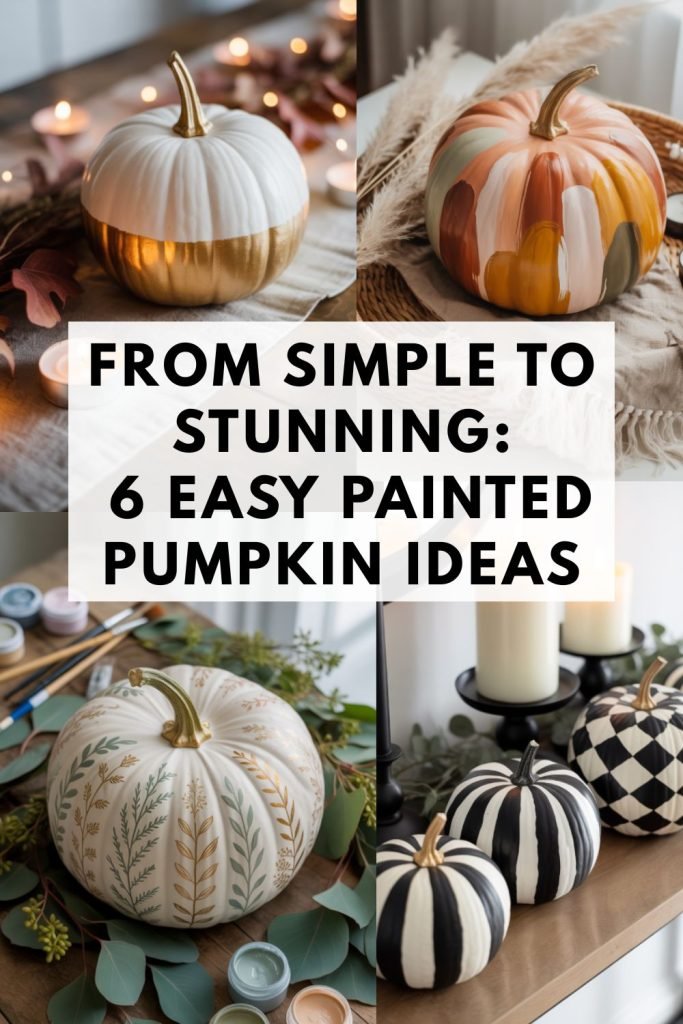
When it comes to fall decorating, nothing feels more iconic than a display of pumpkins — but not everyone wants to deal with the mess of carving or the same old orange color palette. That’s where painted pumpkins come in. With just a few brushes, some paint, and a little imagination, you can turn plain pumpkins into stylish seasonal decor pieces that perfectly fit your home’s aesthetic.
Painted pumpkins are endlessly versatile — whether you love a neutral, minimalist look, crave something bold and modern, or want a fun weekend project to do with the kids. They’re simple enough for beginners, yet look so polished you’d think they came from a boutique. Even better? They last longer than carved pumpkins and can be reused year after year if you opt for faux versions.
In this post, you’ll find a collection of painted pumpkin DIYs that range from quick and easy to eye-catching and intricate — all completely doable with basic supplies. From metallic-dipped beauties to charming hand-painted florals, these ideas will help you take your fall decor from simple to stunning in no time.
Supplies You’ll Need
Before you dive into painting, gather a few basic supplies to make the process smooth and enjoyable. The best part? You might already have most of these on hand.
Basic Supplies
- Pumpkins: Real or faux — both work beautifully. Faux craft pumpkins are ideal if you want to reuse them year after year.
- Acrylic paint: Choose a mix of colors that fit your fall palette — think creamy whites, soft terracotta, sage green, or metallic gold.
- Paint brushes: A variety of sizes helps, from small detail brushes to wider foam brushes for coverage.
- Painter’s tape: Perfect for creating clean lines and geometric designs.
- Paper plate or paint palette: For mixing and blending colors easily.
- Drop cloth or newspaper: Protects your workspace from splatters.
- Matte or satin sealant: Keeps the paint from chipping and adds a subtle finished look.
Optional Extras for Added Style
- Gold leaf or metallic paint: Adds an instant luxe touch.
- Chalk paint: Great for a soft, matte finish that feels farmhouse-chic.
- Stencils: Ideal for floral motifs, lettering, or patterned designs.
- Mod Podge or clear glue: Useful if you’re adding glitter, dried florals, or paper accents.
Pro Tip:
Before painting, wipe down your pumpkins with a damp cloth to remove dirt or residue. If you’re working with slick faux pumpkins, lightly sanding the surface helps the paint adhere better. For a professional finish, apply a thin coat of sealant once the paint is fully dry.
Painted Pumpkin Project Ideas
Now for the fun part! These painted pumpkin projects range from simple one-color makeovers to creative designs that look impressively high-end. Whether your home leans cozy farmhouse, modern minimalist, or colorful and eclectic, there’s an idea here to fit your fall style.
1. Minimalist Monochrome Pumpkins
Sometimes simple really is stunning — and these minimalist monochrome pumpkins prove it. The clean, neutral tones fit beautifully into almost any decor style, from modern farmhouse to Scandinavian-inspired interiors. Even better, they’re incredibly easy to make, and the results look effortlessly elegant.
What You’ll Need:
- Real or faux pumpkins (choose smooth ones for the cleanest finish)
- Acrylic paint in one or two neutral tones — think white, cream, soft taupe, clay, or sage
- Foam brush or wide, flat paintbrush
- Painter’s tape (optional, if you want crisp color-blocked designs)
- Paper towels and a small cup of water for rinsing brushes
- Matte or satin sealant spray
Step-by-Step Instructions:
- Prep Your Pumpkins:
Wipe the surface with a damp cloth to remove any dirt or residue. If your pumpkins are glossy faux versions, lightly sand them with fine-grit sandpaper so the paint adheres better. - Choose Your Color Scheme:
For a timeless, cohesive look, stick with one color family — for example, warm neutrals (ivory, tan, greige) or cool tones (white, gray, sage). Using varying shades of the same color gives your grouping subtle depth without feeling busy. - Apply the Base Coat:
Use a foam brush to apply a thin, even layer of paint, brushing in the same direction for a smooth surface. Let it dry completely (usually about 20–30 minutes), then apply a second coat if needed for full coverage. - Optional Detailing:
If you want to add a bit of interest while keeping the minimalist vibe, try one of these easy upgrades:- Color-blocked base: Tape off the bottom third of the pumpkin and paint it in a slightly darker tone.
- Painted stem: Add a metallic gold or matte black finish to the stem for contrast.
- Lettering: Use a small brush or paint pen to add a simple word (“gather,” “home”) or monogram.
- Seal Your Design:
Once the paint is completely dry, lightly spray your pumpkin with a matte or satin sealant. This helps prevent scuffs and keeps the paint looking fresh, especially if you plan to use it on a porch or high-traffic area.
Styling Tips:
- Group in threes: Odd numbers always look more balanced in decor. Mix different sizes and shades for visual interest.
- Layer with textures: Place your pumpkins on a wood tray, woven placemat, or cake stand to create dimension.
- Add greenery: A few eucalyptus sprigs, dried wheat, or faux magnolia leaves instantly soften the display.
- Mix materials: Combine your painted pumpkins with candles, ceramic vases, or metallic accents for a cozy, curated look.
Pro Tip:
For a high-end, designer finish, use chalk paint instead of traditional acrylic. It dries to a soft, velvety texture that looks gorgeous in neutral palettes and photographs beautifully — perfect for a Pinterest-worthy vignette.
2. Boho Brushstroke Pumpkins
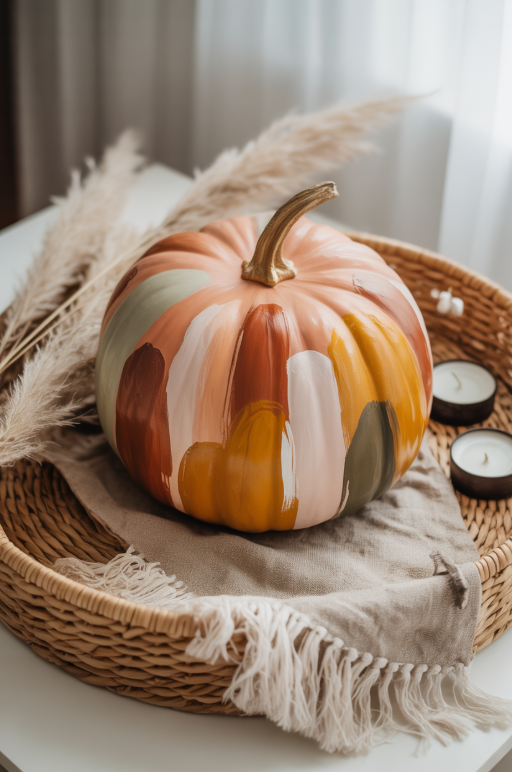
If you love a relaxed, artsy look with warm fall tones, boho brushstroke pumpkins are a perfect project. They strike a balance between casual and stylish — no perfection required! Every brushstroke adds character, making each pumpkin one-of-a-kind. This project is great for beginners who want something creative but forgiving, and it pairs beautifully with natural textures like rattan, jute, and dried botanicals.
What You’ll Need:
- Real or faux pumpkins (smooth surfaces work best)
- Acrylic paints in a boho-inspired palette: rust, terracotta, mustard, blush, olive, cream, or warm white
- Variety of paint brushes (a wide one for larger strokes, small round ones for details)
- Paper plate or paint palette for mixing colors
- Optional: metallic gold or copper paint for accents
- Optional: gold leaf sheets and adhesive for a luxe touch
- Sealant spray (matte or satin finish)
Step-by-Step Instructions:
- Prep the Pumpkin:
Start by wiping down your pumpkin to remove dirt or dust. If using a faux pumpkin, lightly sand shiny surfaces for better paint adhesion. - Paint the Base Color:
Apply a light, neutral base coat — white, cream, or soft tan — to help your brushstrokes pop. Let it dry completely before adding designs. - Create Your Palette:
Choose 3–4 coordinating colors that feel earthy and cozy. Boho palettes often include muted tones — like terracotta, clay, blush, olive, and mustard — instead of bright primaries. - Add the Brushstrokes:
- Dip your brush lightly into one color at a time and create loose, overlapping strokes across the pumpkin’s surface.
- Vary the direction and pressure of your brush for a natural, organic look.
- Don’t aim for symmetry — the beauty is in the imperfect layering.
- For added dimension, use a dry brush technique (lightly loaded with paint) to create soft texture around the edges.
- Add Accents (Optional):
Once the main design is dry, you can enhance it with small metallic details.- Use a fine brush to add subtle gold or copper lines over some strokes.
- For a luxe finish, apply small patches of gold leaf using adhesive and gently press with your finger. This gives your pumpkin a boutique, artisan feel.
- Seal the Design:
After your artwork is completely dry, lightly mist the pumpkin with a matte or satin sealant to protect it. This step helps prevent chipping and gives the paint a soft, finished glow.
Styling Tips:
- Natural setting: Arrange your painted pumpkins on a woven tray or rattan placemat with pampas grass, wood beads, or candles.
- Vary the shapes: Mix round and tall pumpkins for visual interest, keeping the colors within the same family.
- Pair with texture: These look gorgeous next to neutral textiles — linen runners, fringed throws, or macrame wall hangings.
- Group display: Three to five pumpkins in slightly different patterns (all within the same palette) make a stunning centerpiece for a dining table or coffee table.
Pro Tip:
To make cleanup easier, keep a damp cloth nearby and rinse brushes between colors — that way, your palette stays fresh and layered instead of muddy.
3. Metallic-Dipped Pumpkins
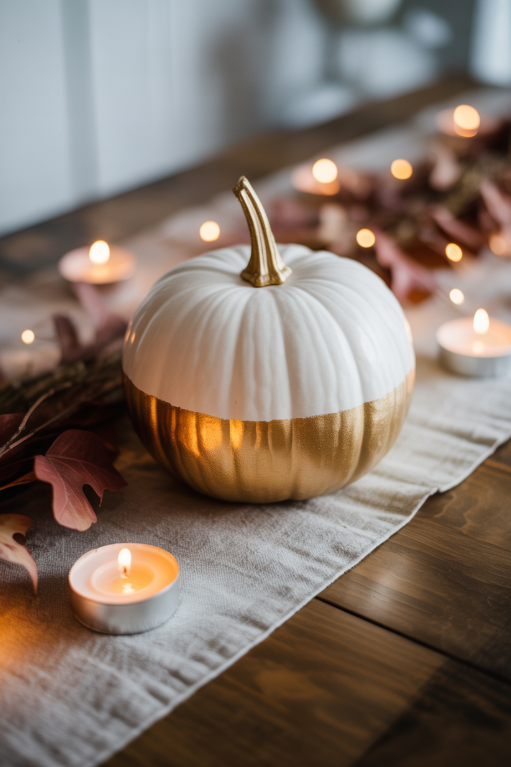
If your fall decor leans a little glam — or you simply love a hint of shimmer — metallic-dipped pumpkins are the perfect DIY project. They’re sleek, modern, and surprisingly easy to create. The mix of matte paint and gleaming metallics instantly makes these pumpkins look designer-worthy, even though they take less than an hour to make.
This is an ideal project if you like clean lines and high-impact results with minimal effort.
What You’ll Need:
- Real or faux pumpkins (smooth, medium-sized ones work best)
- Acrylic paint for your base coat (white, cream, black, or gray are all great choices)
- Metallic paint or spray paint (gold, copper, silver, or rose gold)
- Painter’s tape
- Foam brush or paintbrush
- Drop cloth or newspaper
- Matte or satin sealant spray
Step-by-Step Instructions:
- Prep the Pumpkin:
Wipe your pumpkin clean and let it dry. If using faux pumpkins, make sure the surface is smooth and free of dust. - Apply the Base Coat:
Paint the entire pumpkin with your base color using a foam brush.- For solid, opaque coverage, apply 2–3 thin coats, letting each dry completely before adding the next.
- Lighter bases (like white or cream) make metallic finishes really pop.
- Tape Off the Design:
Once the base coat is dry, decide how much of the pumpkin you’d like to “dip.”- Use painter’s tape to create a clean, even line around the pumpkin — about one-third from the bottom is a good rule of thumb.
- For a more organic look, skip the tape and use a dry brush to softly blend the metallic paint upward.
- Add the Metallic Paint:
- Brush or spray on your chosen metallic color over the exposed section below the tape line.
- Apply thin, even coats and allow each one to dry fully before adding another.
- If using spray paint, do this step outdoors or in a well-ventilated area.
- Remove the Tape Carefully:
Peel the tape off while the metallic paint is still slightly wet — this prevents the paint from lifting and keeps the line crisp. - Seal the Finish:
Once everything is dry, spray lightly with a matte or satin sealant to protect the paint and prevent chipping, especially if you’ll display them outdoors or handle them frequently.
Styling Tips:
- Elegant centerpiece: Line three metallic-dipped pumpkins down the center of your dining table. Add tea lights or taper candles in gold holders for a cozy glow.
- Porch display: Place metallic pumpkins on your steps or near a lantern arrangement — they’ll catch the evening light beautifully.
- Mix metals: Don’t be afraid to combine gold, copper, and silver tones for a collected, modern look.
- Add texture: Surround them with greenery or eucalyptus for a fresh, balanced feel.
Pro Tip:
For a softer, brushed-metal effect, use a dry sponge to dab the metallic paint upward slightly from the tape line. It creates a subtle fade that looks like a natural dip rather than a hard line — perfect if your style leans organic or modern-boho.
4. Floral or Botanical Designs
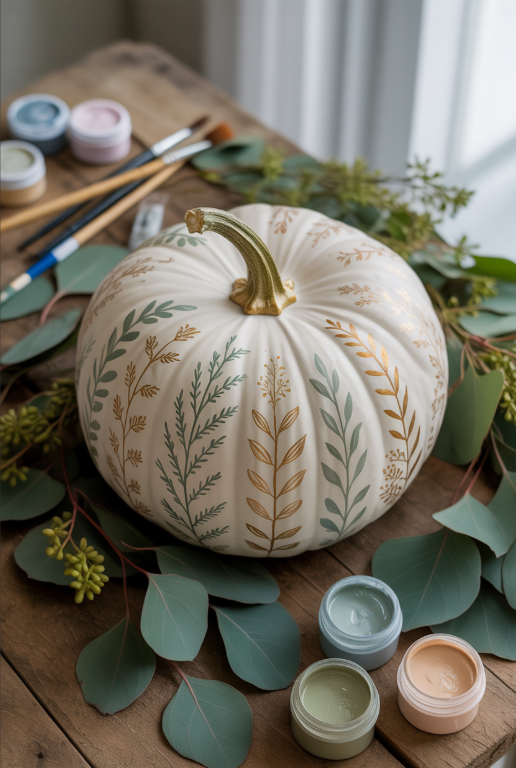
If your fall decor leans soft, romantic, or a little cottagecore, floral-painted pumpkins are a lovely way to bring that charm into your home. These designs add a handcrafted touch that feels both cozy and elegant — like something you’d find in a boutique or seasonal market. The best part? You don’t have to be an artist to pull this off — a few simple techniques (or even stencils) can give you beautiful, detailed results.
What You’ll Need:
- Real or faux pumpkins (lighter colors like white, cream, or blush show details best)
- Acrylic paint in your chosen palette (try soft shades like sage, dusty rose, peach, mustard, and ivory)
- Fine-tip paintbrushes or detail brushes
- Optional: floral or botanical stencils
- Pencil for sketching outlines (optional but helpful)
- Paper plate or paint palette for mixing
- Sealant spray (matte or satin finish)
Step-by-Step Instructions:
- Prep the Pumpkin:
Wipe your pumpkin clean and make sure the surface is dry. If it’s glossy (especially faux pumpkins), lightly sand to help the paint adhere. - Base Coat (Optional):
If your pumpkin is a darker color, start with a coat of light acrylic paint — white, cream, or blush — and let it dry completely. This helps your floral details stand out. - Plan Your Design:
Lightly sketch your floral layout with a pencil. You can cluster flowers near the stem, create a garland around the pumpkin’s middle, or paint smaller scattered blooms for a whimsical look. Don’t worry about perfection — the charm comes from organic, hand-done details. - Paint the Florals:
- Start with the larger shapes (like petals and leaves) using a medium brush.
- Layer in smaller details once the base colors dry — tiny dots, vines, or accent leaves.
- Use slightly watered-down paint for soft, watercolor-like petals, or thicker paint for bolder blooms.
- Popular combinations:
- Blush + sage + ivory for a romantic look
- Mustard + rust + olive for a vintage fall vibe
- Soft blue + cream + gold for a modern twist
- Stencil Option:
If freehand painting feels intimidating, stencils are your best friend. Tape a stencil onto the pumpkin and use a foam brush or sponge to dab paint over it. Gently lift the stencil straight up to avoid smudges, and fill in any gaps with a small brush. - Add Depth:
Once your flowers are dry, use a fine brush to add shading or highlights. A bit of white paint in the center of petals or darker green along leaf edges makes the design pop beautifully. - Seal the Design:
Allow the pumpkin to dry completely before spraying with a clear matte or satin sealant. This step locks in your work and gives the surface a soft, professional finish.
Styling Tips:
- Mantel magic: Place a few floral pumpkins among candles, books, or dried flowers for a cozy cottage look.
- Table centerpiece: Arrange several on a tray or cake stand surrounded by greenery or lace.
- Entryway accent: Display one large floral pumpkin beside a mirror or vase of fall stems for a warm welcome.
- Color coordination: Match your floral palette to the colors in your home for a cohesive seasonal look.
Pro Tip:
If you’re using real pumpkins and want them to last longer, skip the sealant spray and instead display them indoors, away from moisture and direct sunlight. You can also recreate your favorite design on faux pumpkins next year — they store beautifully and become part of your annual fall decor.
5. Black & White Pumpkin Centerpiece
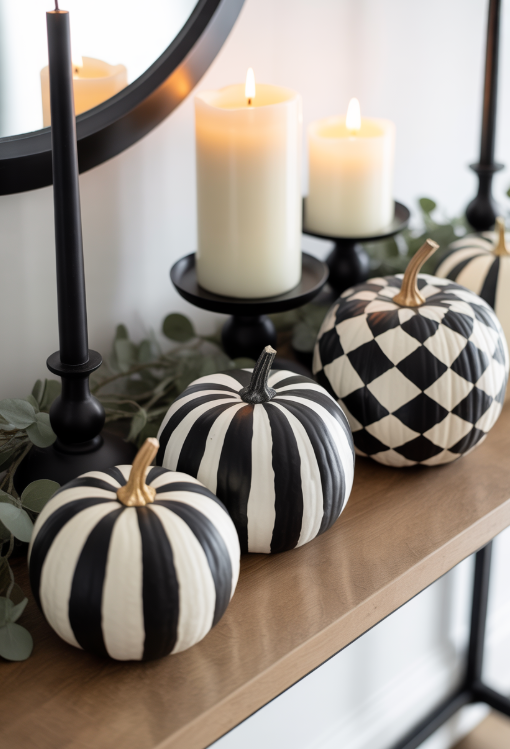
If you love a modern, sophisticated take on fall décor, a black-and-white pumpkin centerpiece is a stunning way to bring drama and contrast to your table. This look works beautifully for both everyday fall decorating and special occasions like Halloween dinners or autumn gatherings. The best part? It’s simple to make and easy to customize with your favorite patterns or finishes.
What You’ll Need
- Small to medium-sized faux pumpkins (foam or plastic)
- Acrylic paint in matte black, white, and optional metallic gold or silver
- Paintbrushes in various sizes
- Painter’s tape (for crisp lines or geometric designs)
- Fine-tip paint pen or permanent marker (for detailing)
- Optional: black-and-white ribbon, candles, and a tray or runner for display
Step-by-Step Instructions
- Choose and Prep Your Pumpkins:
Select a mix of sizes to give your centerpiece visual interest. Wipe them clean to remove dust or oils so your paint adheres smoothly. - Paint Your Base Colors:
- Paint half your pumpkins solid white and the others solid black.
- For perfect coverage, use two thin coats, letting each one dry fully before adding the next.
- Matte finishes look chic and contemporary, but a satin or gloss can add a sleek, high-end touch.
- Add Patterns or Details:
Once the base coat is dry, add personality with bold patterns. Here are a few easy design ideas:- Stripes: Use painter’s tape to create even black-and-white stripes around your pumpkin.
- Polka dots: Use the end of a paintbrush or a cotton swab to dot contrasting colors.
- Checkerboard: For a timeless look, alternate black and white squares.
- Calligraphy or quotes: Use a fine paint pen to write words like “gather,” “thankful,” or “boo.”
- Optional Metallic Accents:
Add a touch of glamour by painting stems in gold or silver, or lightly dry-brushing metallic paint along ridges for subtle shimmer. - Arrange Your Centerpiece:
- Place your finished pumpkins on a neutral tray or wooden board to ground the display.
- Add small candles, votives, or fairy lights between them for a cozy glow.
- For texture, mix in natural elements like eucalyptus sprigs, pinecones, or small white gourds.
Tips for Success
- Keep symmetry in mind: Arrange pumpkins so colors alternate for visual balance.
- Protect your table: Lay down a cloth or runner before assembling to prevent paint transfer.
- Make it cohesive: Stick to two or three repeating patterns for a polished, intentional look.
- Reuse year after year: Faux pumpkins last season after season, so store them carefully in a cool, dry place.
Bonus: Kid-Friendly Pumpkin Painting Ideas
Painting pumpkins is one of those rare fall crafts that’s just as much fun for kids as it is for adults — and with a few smart tweaks, you can set up a creative session that’s mess-free, safe, and totally adorable.
This version keeps things simple while still letting kids’ personalities shine. It’s perfect for a weekend afternoon, a fall party activity, or a cozy indoor project when the weather turns chilly.
Supplies for Little Artists
- Small real or faux pumpkins (mini pumpkins work especially well for small hands)
- Washable craft paint or tempera paint
- Paintbrushes or foam dabbers
- Disposable plates or paint palettes
- Paper towels or wipes for quick cleanup
- Optional extras: stickers, googly eyes, glitter glue, pom-poms, pipe cleaners
Fun Design Ideas Kids Love
- Silly Faces: Let kids paint big smiles, wiggly eyes, or even superhero masks on their pumpkins. Add googly eyes or pipe cleaner hair for extra fun.
- Animal Pumpkins: A white pumpkin can become a cat, panda, or ghost; an orange one might turn into a fox or tiger. Add ears or tails made from paper or felt.
- Galaxy Pumpkins: Use a sponge to dab on layers of black, purple, and blue paint, then splatter white paint for stars.
- Sticker Pumpkins: For a low-mess option, skip the paint altogether and let kids decorate with stickers, washi tape, or adhesive gems.
- Glitter Glow: Paint the pumpkin one color, brush a thin layer of glue on top, and sprinkle glitter for a sparkling finish.
Tips for a Smooth Painting Session
- Cover your workspace: Use a disposable tablecloth or an old sheet to catch drips.
- Keep it short: Aim for 30–45 minutes of painting time before attention spans fade.
- Drying station: Line up a cardboard box or cookie sheet with wax paper for drying pumpkins safely.
- Encourage creativity: There’s no wrong way to paint a pumpkin! Let kids mix colors, paint upside down, or even name their creations.
- Seal if you want to save them: Once dry, spray a clear sealant if you’d like the pumpkins to last longer or display them indoors.
Make It a Family Display
For a sweet finishing touch, group your kids’ painted pumpkins with your more “grown-up” ones — perhaps along a mantle, console table, or front porch step. The mix of playful and polished pieces makes your fall décor feel warm, personal, and full of personality.
Bringing It All Together
From soft neutral pumpkins that fit seamlessly into a modern home to bold black-and-white centerpieces and playful kids’ creations, painted pumpkins prove that fall decorating doesn’t have to be complicated to be beautiful. A little paint and imagination can turn an everyday gourd into something truly special — whether it’s gracing your dining table, brightening your entryway, or adding personality to your porch.
The best part? These projects are endlessly customizable. Try mixing colors that match your home’s palette, experiment with metallics for a luxe twist, or get the whole family involved for a weekend crafting session.
So go ahead — grab a brush, put on your favorite fall playlist, and see how a few painted pumpkins can instantly elevate your seasonal décor. You’ll be amazed at how such a simple project can make your home feel warm, stylish, and full of autumn charm.